E-mail: [email protected] Whatsapp: +8618266768780

E-mail: [email protected] Whatsapp: +8618266768780

Você alcança a máxima eficácia quando planeja e cava um Dreno Francês combinando sua profundidade e design com seu problema específico de drenagem Escolha a profundidade, largura e inclinação da vala certa para seu quintal ou fundação Use o tamanho adequado do cascalho e inspecione o sistema regularmente Muitos proprietários cometem erros como colocando o dreno muito perto da fundação, usando a inclinação errada, e negligenciando a manutenção O planejamento cuidadoso e a atenção aos detalhes ajudam a prevenir problemas de água e garantir resultados duradouros.
Antes de começar a cavar, você precisa entender o problema exato de drenagem em seu quintal Cada tipo de questão de água requer uma abordagem diferente, portanto, identificar a fonte ajuda a planejar a solução mais eficaz.
Muitos proprietários enfrentam desafios de drenagem semelhantes. Você pode notar um ou mais desses sinais:
Se você vê esses problemas, você não está sozinho De acordo com O abeto, água parada e inundações no porão estão entre as reclamações mais frequentes dos proprietários.
Problemas de água superficial geralmente aparecem como poças ou manchas encharcadas em seu gramado Essas áreas podem matar grama e atrair mosquitos Você pode ver água acumulando perto de pátios, passarelas ou calçadas Se você tiver um quintal inclinado, a água pode descer a colina e coletar no ponto mais baixo Para obter mais dicas, confira Reddit's r/Landscaping comunidade, onde os proprietários compartilham soluções de drenagem da vida real.
A água que se acumula perto de sua fundação pode causar rachaduras e danos a longo prazo Você pode notar pontos úmidos nas paredes do porão ou manchas de água ao longo da base de sua casa Este tipo de problema geralmente resulta de má classificação ou calhas entupidas Abordar a água da fundação precocemente ajuda a evitar reparos dispendiosos.
Inundações no porão geralmente acontecem após fortes chuvas A água escoa através de paredes ou pisos, danificando pertences e criando riscos de mofo Se você experimentar inundações repetidas, você precisa de um plano de drenagem direcionado Muitos proprietários instalam um Dreno Francês para redirecionar a água para longe da fundação e manter os porões secos.
Você pode diagnosticar seu problema de drenagem com alguns testes simples:
Este teste mostra como seu quintal inclina-se Uma inclinação adequada afasta a água de sua casa Você também pode verificar a drenagem do solo cavando um buraco de pelo menos 12 polegadas de profundidade e enchendo-o com água Deixe drenar, reabastecer e meça a rapidez com que a água cai em 15 minutos. multiplique a gota por quatro para encontrar a taxa de drenagem horária. Drenagem lenta significa que você pode precisar de soluções extras.
Dica: Caminhe pelo seu quintal após uma chuva forte Faça anotações ou fotos de pontos úmidos e erosão Isso ajuda você a planejar onde instalar recursos de drenagem.
Você precisa combinar sua solução de drenagem com o problema. Uma análise completa do local ajuda você a escolher o melhor local de colocação, tamanho e descarga para o seu Dreno Francês Ao entender os desafios exclusivos do seu quintal, você garante que seu sistema funcione com eficiência e dure anos A identificação adequada economiza tempo, dinheiro e frustração a longo prazo.
Precisas de escolha a profundidade da vala direita para resolver problemas de drenagem de quintal A maioria dos proprietários encontra que uma trincheira entre 18 e 24 polegadas o Deep funciona bem Se você só precisa coletar água superficial, uma trincheira de trabalho padrão de 12 a 1 polegadas geralmente faz o trabalho mais raso Quando seu quintal tem poças frequentes, compactadas ou calhas que esvaziam em áreas problemáticas, você deve considerar cavar mais fundo.
Aqui está uma tabela de referência rápida para cenários comuns:
| Cenário | Profundidade Recomendada |
|---|---|
| Captação de águas superficiais | 12 8 polegadas |
| Drenagem padrão do pátio | 18 4 polegadas |
| Profundidade estendida para porões | 24 polegadas 6+ |
Por exemplo, se você notar a acumulação de água após cada tempestade, uma trincheira com pelo menos 18 polegadas de profundidade ajuda a afastar a água de forma eficiente Em um quintal com solo argiloso pesado, talvez seja necessário ir mais fundo para alcançar camadas mais permeáveis Sempre verifique se há serviços públicos subterrâneos antes de cavar.
Dica: Aumente a profundidade da vala se seu quintal tiver pontos baixos, solo compactado ou se as calhas descarregarem diretamente na área problemática.
Proteger sua fundação da intrusão de água requer uma abordagem diferente Você precisa de um dreno Francês Mais Profundo para interceptar a água antes que ela chegue ao seu porão ou espaço de rastreamento A maioria dos especialistas recomenda uma profundidade de trincheira entre 2 e 6 pés para proteção de fundação Em áreas com inundações severas no porão, as trincheiras podem precisar atingir 6 a 8 pés.
O tipo de solo e o clima também afetam sua decisão Em regiões com geada, pode ser necessário cavar abaixo da linha de geada para evitar o levantamento Por exemplo, em climas mais frios, as trincheiras geralmente atingem profundidades de 3 a 4 metros (cerca de 10 a 13 pés), mas a maioria dos projetos residenciais permanece dentro da faixa de 2 a 6 pés Se o seu solo é pesado em argila, procure pelo menos 3 pés para garantir a drenagem adequada.
Observação: Incorpore sempre a trincheira pelo menos 6 a 12 polegadas no subsolo subjacente para estabilidade, especialmente se você tiver argila expansiva.
A largura e a inclinação do seu Dreno Francês desempenham um grande papel na sua eficácia Uma largura de vala de 6 a 12 polegadas permite espaço suficiente para cascalho e o tubo de drenagem Trincheiras mais estreitas podem entupir mais facilmente, enquanto trincheiras mais largas lidam com mais água, mas exigem mais escavação.
Aqui está uma tabela para orientar suas escolhas:
| Requisito Profundidade | Recomendação Largura |
|---|---|
| 12 polegadas (água superficial) | 6 polegadas |
| 18 4 polegadas (jarda) | 6 polegadas |
| 2 pés (fundação) | 8 polegadas |
A inclinação é tão importante quanto Você precisa de uma inclinação mínima de 1%hat significa uma queda de 1 polegada para cada 10 pés de trincheira Esta inclinação suave mantém a água em movimento sem causar erosão ou danos ao tubo.
| Requisito de inclinação | Descrição |
|---|---|
| Inclinação Mínima | 1% (queda de 1 polegada por 10 pés de comprimento) |
Se o seu quintal for plano, use um nível de corda para definir a inclinação correta antes de cavar. Em pátios inclinados, siga o nível natural, mas verifique se a inclinação permanece consistente ao longo da vala.
Dica: Um Dreno Francês bem projetado com a largura e inclinação certas evita a água parada e protege a fundação da sua casa por anos.
Você precisa combinar seu design de dreno francês com o tipo de solo e as características da paisagem do seu quintal O solo afeta como a água se move e quão estável sua trincheira permanece ao longo do tempo Você pode evitar erros comuns entendendo essas diferenças antes de cavar.
Comece testando seu solo Escave um pequeno buraco e aperte um punhado de terra úmida A argila se sente pegajosa e mantém sua forma A areia se sente arenosa e desmorona A argila se sente macia e quebradiça Cada tipo precisa de uma abordagem diferente.
Aqui está um tabela mostrando como o tipo de solo altera a estabilidade e inclinação da vala:
| Tipo de solo | Estabilidade | Relação de inclinação recomendada | Ângulo Máximo de Inclinação |
|---|---|---|---|
| Argila (Tipo A) | Mais estável | 3/4:1 | 53° |
| Loam (Tipo B) | Estabilidade moderada | 1:1 | 45° |
| Areia (Tipo C) | Menos estável | 1-1/2:1 | 34° |
Se você tem solo argiloso, você pode cavar paredes de trincheira mais íngremes A argila mantém sua forma e resiste ao colapso Você precisa de menos cascalho para apoiar os lados Em solo arenoso, você deve inclinar as paredes da trincheira suavemente A areia muda facilmente e colapsa se o ângulo for muito íngreme Você deve usar tecido de filtro extra e mais cascalho para manter o dreno funcionando.
Dica: Em pátios arenosos, alargue a trincheira e use uma inclinação de 1-1/2:1 Isso significa que para cada pé de profundidade, faça a trincheira com pelo menos 1,5 pés de largura no topo.
As características da paisagem também mudam seu plano Se sua inclinação do quintal, siga o grau natural, mas verifique a inclinação com um nível de corda Em jardas planas, defina a inclinação da trincheira você mesmo Você pode usar estacas e um nível para medir a queda Mire para uma inclinação mínima de 1%3 queda de 1 polegada para cada 10 pés.
Considere este cenário: Você vive em um bairro com solo argiloso pesado e uma inclinação suave em direção à sua casa Você cava uma trincheira com lados íngremes, seguindo a proporção de 3/4:1 Você usa menos cascalho e as paredes permanecem firmes Seu vizinho tem solo arenoso e um pátio plano Eles cavam uma trincheira larga com encostas suaves, adicionam cascalho extra e usam tecido de filtro para evitar que a areia entupisse o tubo.
Você pode ajustar a profundidade e largura da sua vala com base nesses fatores Sempre verifique se há serviços públicos subterrâneos antes de cavar Se você vir a água acumulando em pontos baixos, comece sua vala no ponto mais alto e corra-a ladeira abaixo Você pode usar características da paisagem como valas ou bermas para direcionar a água em direção ao dreno.
Observação: Combinar o design da trincheira com o solo e a paisagem ajuda o dreno francês a durar mais e funcionar melhor Você evita o colapso, entupimentos e desperdício de esforço.
Você precisa escolher o melhor caminho para o seu Dreno Francês estudando as áreas problemáticas do seu quintal Caminhe pela sua propriedade depois de uma chuva forte Procure por pontos onde as piscinas de água ou o solo permaneçam encharcados Estes são os melhores pontos de partida para o seu dreno Certifique-se de que a rota que você seleciona permita que a água flua ladeira abaixo A gravidade ajuda a mover a água, então escolha um caminho que caia em elevação.
Ao planejar a rota, tenha em mente estes pontos:
Por exemplo, se o seu quintal coleta água perto de um pátio, comece o ralo lá e direcione-o para uma parte mais baixa e não utilizada do seu quintal Se você tiver um jardim, encaminhe o ralo ao redor dele para evitar lavar o solo.
Você deve definir a inclinação correta para o seu Dreno Francês funcionar bem A trincheira deve cair pelo menos 1 polegada para cada 8 pés de comprimento Isso é igual a a Inclinação 1%. Use estacas e um nível de string para medir a queda antes de cavar Marque os pontos inicial e final e verifique a diferença de altura.
Siga estes passos para definir a inclinação:
Uma inclinação suave mantém a água em movimento sem causar erosão Se o seu quintal é plano, você pode precisar cavar mais fundo na saída para criar a queda certa Em um caso, um proprietário com um gramado plano cavou a trincheira mais profundamente na extremidade para alcançar a inclinação necessária, o que resolveu seu problema de água parada.
Dica: Sempre verifique novamente a inclinação antes de instalar o tubo Um pequeno erro pode fazer com que a água faça backup em vez de drenar.
Antes de começar a cavar, verifique os códigos de construção locais. Algumas cidades exigem licenças para novos sistemas de drenagem, especialmente se você planeja se conectar a um esgoto municipal ou drenar perto de um poço. Outros projetos, como adicionar um pequeno dreno francês que não altera os padrões de escoamento, podem não precisar de licença.
Aqui está um tabela de referência rápida:
| Precisa de uma licença | Não Precisa de Permissão |
|---|---|
| Novo dreno desvia um riacho ou zona úmida | Pequeno dreno que não altera o fluxo de escoamento |
| O dreno deságua no esgoto ou vala municipal | |
| Descargas de drenagem perto de um poço ou campo de lixiviação | |
| A propriedade tem lençol freático raso |
Entre em contato com o departamento de construção local antes de começar Esta etapa ajuda a evitar multas e garante que seu projeto atenda aos padrões de segurança Em um bairro, um proprietário teve que mover seu ralo porque esvaziou muito perto de um poço, o que violou as regras locais.
Observação: Sempre ligue para o 811 ou para o localizador de serviços públicos local antes de cavar para evitar atingir as linhas subterrâneas.

Precisas do ferramentas e materiais certos para construir um dreno francês que funciona bem e dura anos A preparação cuidadosa economiza tempo e evita erros durante a instalação Aqui está uma lista de verificação para ajudá-lo a reunir tudo antes de começar a cavar:
Dica: Alugue um escavador de trincheiras motorizado se você tiver uma trincheira longa ou profunda Esta máquina economiza tempo e reduz a tensão física.
| Material | Propósito | Notas |
|---|---|---|
| Cascalho (3⁄4” limpo) | Circula o tubo, melhora a drenagem | O cascalho lavado evita entupimentos |
| Tubo perfurado | Transporta água pela trincheira | O diâmetro de 4 polegadas é padrão |
| Tecido filtro | Evita que o solo entupir o cascalho/tubo | Use tecido não tecido e permeável à água |
| Tubo sólido | Direciona a água do final do dreno | Use para seções de descarga |
| Acessórios tubulação | Conecta seções de tubos e muda de direção | Cotovelos, acopladores, tampas de extremidade |
Você pode encontrar esses materiais na maioria das lojas de materiais de construção Escolha sempre cascalho e tecido de alta qualidade para obter melhores resultados.
Imagine que você planeja um dreno francês para um quintal com solo argiloso pesado Você reúne uma pá de valas, um carrinho de mão e um nível de linha Você compra cascalho lavado, um tubo perfurado de 4 polegadas e tecido de filtro não tecido Você marca a rota com estacas e tinta Durante a escavação, você atinge várias raízes de árvores Você usa uma mattock para quebrá-las As ferramentas certas ajudam você a terminar a trincheira em um fim de semana.
Observação: Sempre ligue para o localizador de utilidades local antes de cavar. Esta etapa mantém você seguro e evita danos dispendiosos.
Com as ferramentas e materiais certos, você se prepara para uma instalação suave e um dreno francês que resolve seus problemas de drenagem.
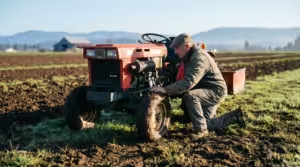
Você começa marcando a rota da trincheira Caminhe seu quintal depois de uma tempestade e procure áreas onde piscinas de água Use estacas ou tinta spray para marcar esses pontos Dirija estacas no chão nos pontos de início e fim de sua trincheira planejada Amarre uma corda entre as estacas e use um nível de linha para verificar se a corda está uniforme Ajuste a corda para criar uma inclinação de cerca de 1 polegada para cada 10 pés. Esta inclinação ajuda o fluxo de água em direção ao seu escolhido local descarga, como um bueiro da cidade ou uma vala.
Antes de cavar, ligue para o localizador de serviços públicos local para marcar linhas subterrâneas Esta etapa mantém você seguro e evita danos Verifique com as autoridades locais quaisquer restrições de zoneamento ou permissões que você possa precisar Uma vez que você tenha aprovação, use uma pá ou alugue uma valetadeira para cave a trincheira. Aponte para uma profundidade de 16 a 18 polegadas e uma largura de 9 a 16 polegadas Verifique constantemente a inclinação com sua corda e nivelar enquanto você cava Uma inclinação consistente garante uma drenagem adequada.
Dica: Se você tem solo argiloso pesado, cavar pode demorar mais Use uma picareta para quebrar o solo duro Em um caso, um proprietário descobriu que alugar uma valetadeira economizou horas de trabalho e ajudou a manter uma trincheira reta e uniforme.
Depois de terminar de cavar, forre a trincheira com tecido filtro geotêxtil. Este tecido impede que o solo e as partículas finas entrem no sistema de drenagem Coloque o tecido suavemente ao longo do fundo e dos lados da vala Evite lacunas ou dobras, o que pode deixar o solo infiltrar-se e entupir o tubo Certifique-se de que o tecido se sobreponha nas bordas para uma cobertura completa.
Use tecido geotêxtil perfurado duplo para proteção extra Em solo arenoso, este passo é especialmente importante Um proprietário em uma área costeira alinhou sua trincheira com tecido geotêxtil e notou que seu Dreno Francês permaneceu claro e eficaz por anos, mesmo com chuvas frequentes.
Observação: O tecido atua como uma barreira, mantendo o solo fora enquanto permite a passagem de água Esta etapa aumenta a vida útil do seu sistema de drenagem.
Você precisa adicionar uma base de cascalho antes de instalar o tubo Escolha Pedra britada #57, que mede ½ a 1 polegada Este tamanho permite que a água flua livremente e evita entupimento Despeje 4 a 6 polegadas de cascalho no fundo da vala para a maioria dos sistemas de drenagem de quintal Se você estiver protegendo uma fundação, use 6 a 12 polegadas de cascalho Para drenagem superficial, 3 a 4 polegadas podem ser suficientes, dependendo do seu solo.
Espalhe o cascalho uniformemente ao longo da trincheira Use um ancinho para nivelá-lo O cascalho deve cobrir o tecido e criar uma cama estável para o tubo Em um caso, um proprietário usou pedras redondas limpas e grandes para a base e descobriu que a água drenava rapidamente, mesmo após fortes tempestades.
Dica: Sempre use cascalho lavado para evitar que sujeira e detritos obstruam o sistema Evite usar gravilha de ervilha ou peneiras de calcário, que podem compactar e bloquear o fluxo de água.
Seguindo estes passos, você define uma base sólida para o seu Dreno Francês Você garante que a água se afaste eficientemente das áreas problemáticas e que seu sistema permaneça claro e eficaz por anos.
Precisas de instale o tubo de drenagem com cuidado para garantir que seu dreno francês funcione eficientemente por anos Comece escolhendo um tubo perfurado, geralmente com 10 centímetros de diâmetro Este tubo permite que a água entre por todos os lados e flua para longe das áreas problemáticas Coloque o tubo no topo da base de cascalho que você preparou anteriormente Certifique-se de que os buracos fiquem voltados para baixo Esta posição permite que a água escoe do cascalho e entre no tubo.
Verifique a inclinação da vala antes de colocar o tubo Use um nível para confirmar as quedas da vala pelo menos 1 polegada a cada 10 pés Uma inclinação consistente mantém a água em movimento e evita a acumulação dentro do tubo Se você notar quaisquer quedas ou subidas, ajuste a base de cascalho até que o tubo se sente uniformemente.
Conecte seções de tubos usando acopladores ou cotovelos Empurre as extremidades juntas até que elas se encaixem perfeitamente Se sua vala mudar de direção, use um encaixe de cotovelo para guiar o tubo em torno dos cantos Proteja cada conexão com fita de PVC, às vezes chamada de fita de ladrilho Essa fita elástica e estanque sela as juntas e evita vazamentos Enrole a fita firmemente em torno de cada junta para um ajuste seguro.
Depois de colocar o tubo, teste o sistema antes de cobri-lo Despeje água na vala no ponto mais alto Observe a rapidez com que ele flui através do tubo e sai no local de descarga Se a água se mover lentamente ou recuar, verifique se há entupimentos ou encostas irregulares Ajuste o tubo ou cascalho conforme necessário.
Dica: Sempre use tecido filtro não tecido para envolver o tubo e cascalho Este método “burrito wrap” mantém o solo fora e prolonga a vida útil do seu dreno.
Você pode encontrar obstáculos, como raízes de árvores ou pedras durante a instalação do tubo Corte raízes com uma serra ou mattock Remova pedras e preencha lacunas com cascalho extra Em um caso, um proprietário encontrou várias raízes grandes em sua trincheira Eles usaram uma serra de poda para cortar as raízes e continuaram colocando o tubo sem demora.
Se sua vala passa sob uma passarela ou entrada de automóveis, use um tubo sólido para essa seção Tubo sólido impede que a água escoe e enfraqueça a superfície acima Volte para o tubo perfurado assim que você limpar o obstáculo.
Verifique o alinhamento do tubo antes de passar para a próxima etapa O tubo deve ficar plano no cascalho, seguir a rota da vala e manter uma inclinação constante Um tubo bem instalado garante que seu dreno francês colete e mova a água com eficiência, protegendo seu quintal e fundação de problemas futuros.
Você precisa escolher o tubo direito para o seu Dreno Francês para garantir que a água se mova de forma eficiente A maioria dos proprietários usa tubos perfurados feitos de PVC rígido ou plástico ondulado flexível Os tubos perfurados têm pequenos orifícios ou ranhuras que permitem a entrada de água do cascalho circundante Os tubos rígidos de PVC oferecem força e resistem ao esmagamento, tornando-os uma boa escolha para áreas com solo pesado ou tráfego Os tubos ondulados flexíveis dobram-se em torno de curvas e obstáculos, o que ajuda se a rota da sua trincheira não for reta.
Se o seu quintal tem muitas raízes de árvores ou pedras, você pode encontrar tubo flexível mais fácil de instalar Em um caso, um proprietário com um caminho de jardim sinuoso usou tubo flexível para seguir as curvas sem acessórios extras.
Selecione sempre um tubo com um diâmetro de pelo menos 4 polegadas Este tamanho lida com a maioria das necessidades de drenagem residencial e evita entupimentos Para seções sob calçadas ou passarelas, use um tubo sólido para evitar que a água escoe e danifique a superfície.
Você precisa do cascalho certo para manter seu Dreno Francês funcionando por anos O tamanho e a forma da matéria de cascalho Escolha cascalho que seja maior que os buracos em seu tubo Isso evita que pequenas pedras entrem e obstruam o tubo Pedras naturais redondas, sobre 1 1/2 polegada de diâmetro, funcionam bem porque filtram detritos e deixam a água fluir facilmente Pedra esmagada e cascalho de alta qualidade também melhoram a drenagem e suportam o fluxo de água pesada.
Um proprietário com um quintal que inundava a cada primavera mudou para cascalho maior e redondo Após a mudança, a água drenou mais rápido e o problema desapareceu.
Evite usar gravilha de ervilha ou telas de calcário Esses materiais podem compactar e bloquear o fluxo de água, levando a entupimentos.
Você precisa de tecido de filtro, também chamado tecido geotêxtil não tecido, para proteger o seu Dreno Francês de tamancos Este tecido envolve o cascalho e o tubo, agindo como uma barreira que bloqueia o solo e os detritos enquanto deixa a água passar Ele serve três funções principais: filtração, separação e prevenção de entupimentos. O tecido evita que o solo migre para o cascalho e para o tubo, o que ajuda a manter o fluxo constante da água.
Em um caso em que um proprietário pulou o tecido do filtro, o dreno entupiu dentro de um ano Depois de substituir o sistema e adicionar tecido, o dreno permaneceu claro e eficaz.
Sempre sobreponha o tecido nas costuras e cubra toda a vala Este passo garante proteção total e mantém seu sistema de drenagem funcionando no seu melhor.
Você pode notar a acumulação de água em seu quintal, mesmo depois de instalar um dreno francês Este problema muitas vezes acontece quando você pular o tecido de drenagem ou escolher o tubo errado O solo e os detritos podem entupir o dreno rapidamente se você não usar o tecido do filtro Tubos que são muito pequenos ou não têm perfurações fluxo de água lento e tornar o sistema ineficaz Por exemplo, um proprietário instalou um dreno francês com um tubo sólido e sem tecido Dentro de meses, o dreno parou de funcionar porque lama e raízes bloquearam o tubo Você pode evitar esse erro usando tubos perfurados e embrulhando-os com tecido de filtro.
Dica: Verifique sempre o seu dreno após fortes chuvas Se a água não se afastar, inspecione o tubo e o cascalho quanto a bloqueios.
A profundidade ou inclinação incorreta da vala pode causar problemas de drenagem Você pode identificar esses problemas medindo a inclinação com estacas e cordas Coloque estacas em ambas as extremidades da vala e amarre uma corda entre elas Use um nível para verificar a inclinação Marque a profundidade correta em cada estaca e meça a diferença do nível do solo Reorganize o cascalho na vala para ajustar a inclinação Certifique-se de que o tubo de drenagem segue a inclinação calculada Se você conectar vários drenos, mantenha essas seções niveladas Outras seções devem seguir a inclinação que você definir.
Passos para fixar a profundidade ou inclinação:
Um proprietário notou uma drenagem lenta após instalar um dreno francês Eles usaram estacas e barbante para medir a inclinação e encontraram um ponto baixo no meio da trincheira Depois de adicionar cascalho para levantar o tubo, a água fluiu suavemente novamente.

Você precisa manter seu dreno francês para evitar entupimentos e manter a água em movimento Limpe as grades de drenagem regularmente para remover folhas e sujeira Use uma cobra de encanamento para verificar se há bloqueios dentro do tubo Classifique o solo ao redor do dreno para que a água flua em direção a ele Inspecione o ponto de acesso do dreno quanto a danos e certifique-se de alcançá-lo facilmente Observe quaisquer áreas em seu quintal que permaneçam molhadas após a chuva Lave o dreno com uma mangueira de jardim para testar se há entupimentos Limpe o dreno pelo menos uma vez por ano e observe a drenagem lenta, o que sinaliza um possível bloqueio.
Lista de verificação de manutenção:
Um proprietário que limpava seu ralo francês a cada primavera nunca teve problemas com entupimentos A manutenção regular ajuda seu sistema a durar mais e mantém seu quintal seco.
Você precisa escolher um local de descarga seguro e eficaz para o seu dreno francês A saída certa garante que a água saia da sua propriedade sem causar novos problemas Aqui estão algumas opções de descarga comuns:
Um proprietário com um quintal plano instalou um poço seco no final de seu dreno francês Esta solução impediu a acumulação de água e evitou pontos encharcados após fortes chuvas.
Dica: Verifique sempre se o seu ponto de descarga não envia água para a propriedade ou calçada pública de um vizinho.
Você deve seguir as regras locais ao escolher um local de descarga Muitas cidades têm regulamentos rigorosos sobre onde você pode direcionar as águas pluviais Algumas áreas proíbem a descarga de água perto de poços, sistemas sépticos ou vias públicas Outros exigem licenças para conexão a drenos municipais.
Entre em contato com o departamento de construção local antes de terminar seu projeto Pergunte sobre distâncias de recuo, pontos de descarga aprovados e qualquer papelada que você precise Em um caso, um proprietário teve que mover sua saída de drenagem francesa porque estava muito perto de uma zona úmida protegida Verificar as regras cedo economizou tempo e dinheiro para eles.
Observação: Ligue para o localizador de serviços públicos local antes de cavar para evitar danificar as linhas subterrâneas.
Antes de cobrir sua trincheira e chamar o trabalho feito, realizar uma inspeção completa Esta etapa garante que seu dreno francês funciona como planejado e evita futuras dores de cabeça Use isso checklist para orientar sua revisão final:
Um proprietário uma vez pulou a inspeção final e mais tarde encontrou água acumulando perto de sua fundação Depois de verificar novamente a inclinação e fixar um ponto baixo, o dreno funcionou perfeitamente.
. Inspeção cuidadosa agora salva você de reparos caros mais tarde. Não tenha pressa e verifique cada detalhe.
Você pode alcançar resultados duradouros seguindo estas etapas essenciais ao planejar e cavar um dreno francês:
Combinar a profundidade, largura e inclinação da vala com o seu problema de drenagem garante que o sistema funcione de forma eficiente A manutenção regular evita entupimentos e protege sua propriedade contra danos causados pela água Sempre verifique os códigos locais antes de iniciar e considere inspeções profissionais para manter seu dreno eficaz por anos.
Você deve cavar de 18 a 24 polegadas de profundidade para a maioria dos pátios molhados Se você ver água acumulando após a chuva, essa profundidade ajuda a afastar a água Em um caso, um proprietário resolveu problemas encharcados de gramado com uma trincheira de 20 polegadas.
Sim, você pode instalar um dreno francês com ferramentas básicas e planejamento cuidadoso Muitos proprietários usam pás, um nível de linha e cascalho Uma pessoa terminou um dreno de 30 pés durante um fim de semana seguindo as instruções passo a passo.
Use cascalho limpo e angular com cerca de 3⁄4 a 1½ polegadas de tamanho Este cascalho permite que a água flua livremente Um proprietário que mudou de cascalho de ervilha para pedras maiores viu uma drenagem mais rápida e menos tamancos.
Você deve verificar o dreno após fortes chuvas, limpar os detritos das grades e lavar o tubo anualmente Um proprietário usou uma mangueira de jardim para testar o fluxo a cada primavera e evitou entupimentos por anos.
Direcione a saída para uma área segura como um poço seco, vala de drenagem ou encosta gramada Nunca descarregue perto da propriedade de um vizinho Em um exemplo, um proprietário usou um poço seco para evitar que a água se acumulasse em seu quintal.
Sim, o tecido de filtro evita que o solo obstrua o cascalho e o tubo Pular esta etapa geralmente leva a bloqueios Um proprietário que adicionou tecido depois que um entupimento descobriu que seu ralo permaneceu limpo e eficaz.
Aponte para uma inclinação de 11TP3 T, ou uma queda de 1 polegada a cada 8 a 10 pés Esta inclinação suave mantém a água em movimento Um proprietário fixou a água parada ajustando a trincheira para manter uma queda constante.
Sim, você pode executar um dreno francês sob uma entrada de automóveis Use tubo sólido para esta seção para evitar que a água escoe para cima Um proprietário evitou rachaduras na entrada de automóveis, mudando para tubo sólido sob o concreto.


-1.png)