Email: [email protected] Whatsapp: +8618266768780

Email: [email protected] Whatsapp: +8618266768780

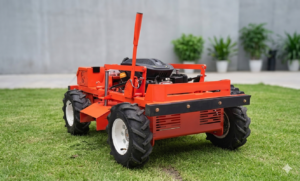
You might wonder if you can mow a lawn with a mini Excavator. This method offers unique advantages, such as handling tough terrain and tackling overgrown areas efficiently. However, you also face challenges like maneuvering heavy machinery and avoiding turf damage.
Safety must come first. Always use the right equipment and follow proper technique.
Consider your lawn’s size, surface, and condition before you start. This approach works best for larger, rugged spaces rather than delicate or small yards.

Before you start mowing your lawn with a mini Excavator, you need to gather the right equipment. Choosing suitable tools and safety gear ensures a smooth and safe mowing experience. Below, you will find a breakdown of what you need and why each item matters.
You should select a mini Excavator that matches the size and terrain of your lawn. For small to medium lawns, a compact model offers better maneuverability and less risk of turf damage. If your lawn has uneven ground or thick brush, a slightly larger mini Excavator provides more power and stability. Always check the operating weight and reach of the machine to make sure it fits your mowing area. You can find helpful guides and user experiences on social media platforms that discuss mini Excavator choices for landscaping tasks.
The right mower attachment transforms your mini Excavator into a powerful mowing tool. Each type of attachment serves a specific purpose. The table below compares common mower attachments for grass cutting:
| Attachment Type | Best Use Case | Cutting Capacity | Special Features |
|---|---|---|---|
| Flail Mower | Tall weeds, mulching trees | Up to 2-3 inches thick | Rotating shaft, multiple blades |
| Rotary Cutter | Grass, brush, fast mowing | Up to 4 inches thick | Speed, versatility |
| Brush Cutter | Dense vegetation, thick brush | Up to 4 inches thick | Handles tough materials |
A flail mower works well for cutting tall weeds and mulching small trees. The rotating shaft with multiple blades shreds vegetation efficiently. You should use this attachment if your lawn has overgrown areas or uneven terrain.
A rotary cutter excels at mowing grass and brush quickly. This attachment suits lawns that need regular maintenance and covers large areas. You can rely on its speed and versatility for efficient mowing.
Tip: Always inspect the mower attachment before use. Make sure the blades are sharp and securely fastened. Sharp blades give your lawn a cleaner look and help the grass recover faster.
Operating a mini Excavator for mowing requires proper safety gear. You should wear:
These items protect you from flying debris, loud noise, and accidental bumps. Safety gear reduces the risk of injury and keeps you focused on the task.
Note: Dull blades can cause uneven cuts and increase the risk of grass diseases. Sharp blades minimize stress on the turf and promote healthier grass.
When you prepare your equipment, check that all attachments fit securely. Loose or poorly attached mowers can lead to accidents or equipment damage. You should always follow the manufacturer’s instructions for installation and maintenance.
By gathering the right equipment and safety gear, you set yourself up for a successful mowing session with your mini Excavator. This preparation helps you achieve a clean, healthy lawn and reduces the chance of problems during operation.
Before you start mowing, you need to prepare both your lawn and your mini Excavator. Careful preparation helps you avoid hazards, protect your equipment, and achieve a cleaner cut.
Begin by walking your entire lawn. Look for anything that could damage your equipment or cause injury. You should:
Tip: Take photos of any problem areas and share them with local lawn care groups on social media. You can get advice from others who have tackled similar challenges.
A thorough inspection of your mini Excavator ensures safe and efficient operation. Follow these steps:
Set up your work area to maximize safety and efficiency. Use this checklist:
Note: A well-prepared work area reduces the risk of accidents and helps you mow more efficiently.
By following these preparation steps, you set yourself up for a safe and successful mowing session. Careful inspection and setup protect both your lawn and your equipment.
Attaching the mower to your mini Excavator requires careful attention to detail. You want to ensure a secure fit and proper settings before you begin mowing. Follow these steps for a safe and effective setup.
Start by positioning the mower attachment near the mini Excavator. Align the mounting points on both machines. Use the quick coupler or pin system to connect the mower. Make sure all locking pins and safety clips are in place. Tighten bolts according to the manufacturer’s specifications. You should check for any visible gaps or misalignment.
Tip: Many experienced operators share step-by-step videos on social media platforms. Watching these can help you understand the attachment process and avoid common mistakes.
After securing the mower, test the stability before operating. Lift the attachment a few inches off the ground. Move the arm slowly from side to side. Watch for any wobble or unusual movement. If you notice instability, stop and recheck the connection points. A stable attachment prevents accidents and ensures smooth mowing.
| Test Step | What to Look For | Action if Issue Found |
|---|---|---|
| Lift attachment | Smooth, steady movement | Re-tighten bolts, check pins |
| Swing arm | No wobble or shifting | Inspect coupler, realign |
| Visual inspection | No gaps or loose parts | Secure all fasteners |
Before you start mowing, adjust the mower settings for optimal results. Use the excavator controls to set the cutting height. The right height depends on your lawn’s vegetation and terrain. Avoid setting the mower too low. This protects both the mower and your lawn’s surface.
Note: Operators often share tips on forums and social media about adjusting mower settings for different lawn types. These resources can help you fine-tune your approach.
You should always review the operator’s manual for both the mini Excavator and the mower attachment. Manuals provide specific guidance for your equipment model. Proper adjustment leads to a cleaner cut and reduces wear on your tools.
By following these steps, you ensure the mower is securely attached and set up for efficient mowing. Careful preparation helps you achieve a healthy, well-maintained lawn.

You should begin mowing by outlining the border of your lawn. This step creates a clear perimeter and helps you avoid missing any edges. Drive the mini Excavator slowly along the outer edge. Keep the mower attachment slightly above the soil to prevent scalping. Use the controls to maintain a steady speed and direction. If your lawn has flower beds or trees near the border, steer carefully to avoid damaging them.
A well-defined border acts as a guide for the rest of your mowing pattern. You can use this initial pass to spot any obstacles or uneven ground. Many experienced operators recommend starting with the border because it sets up a neat frame for straight line passes.
Tip: Always check for hidden objects near the edges before you start. This habit protects your equipment and keeps your lawn looking tidy.
After you finish the border, mow the interior in straight lines. Position the mini Excavator at one end of the lawn and drive forward in a straight path. Overlap each pass slightly to ensure complete coverage. Straight line mowing creates a uniform appearance and reduces the chance of missed spots.
You can use the following table to plan your mowing pattern based on lawn size:
| Lawn Size | Recommended Pass Width | Overlap Amount | Suggested Speed |
|---|---|---|---|
| Small (<1 acre) | 3-4 feet | 6 inches | Slow |
| Medium (1-3 acres) | 5-6 feet | 8 inches | Moderate |
| Large (>3 acres) | 7-8 feet | 10 inches | Steady |
If you encounter thick or uneven grass, slow down and raise the mower slightly. This adjustment prevents clogging and keeps the cut even. For lawns with slopes, mow up and down rather than across to maintain stability.
Note: Straight line passes save time and fuel. They also make it easier to spot areas that need extra attention.
You should change your mowing pattern each time you mow. Varying the direction and path offers several benefits:
For example, if you mow north to south one week, switch to east to west the next time. You can also try diagonal patterns for a unique look. Many lawn care professionals share photos of creative mowing patterns on social media, showing how alternating directions leads to healthier grass.
Tip: Regularly changing your mowing pattern helps your lawn recover faster and grow more evenly.
You can track your mowing patterns using a simple notebook or a mobile app. Record the direction and date of each session. Over time, you will notice improved grass density and fewer problem areas.
Setting the correct cutting height is essential for healthy grass and a clean finish. When you mow with a mini Excavator, you control the mower attachment height using the hydraulic arm. You should adjust the height before you start and check it as you move across different areas of your lawn.
Different grass types need different cutting heights. Cutting too low can stress the grass and expose soil, while cutting too high may leave the lawn looking shaggy. Use the table below to find the best height for your grass:
| Grass Type | Optimal Cutting Height |
|---|---|
| Tall fescue | 3-4 inches |
| Kentucky bluegrass | 2.5-3.5 inches |
| Perennial ryegrass | 2.5-3.5 inches |
| Fine fescue | 2.5-4 inches |
| Bermuda grass | 1.5-2 inches |
| St. Augustine grass | 2.5-4 inches (never below 2.5 inches) |
| Zoysia grass | 1-2.5 inches |
| Centipede grass | 1.5-2 inches |

For example, if you have Kentucky bluegrass, set your mower between 2.5 and 3.5 inches. If your lawn has Bermuda grass, keep the height between 1.5 and 2 inches. You can use the hydraulic controls to raise or lower the mower as you move from one section to another.
Tip: Always measure the grass after your first pass. If you notice uneven cuts, adjust the height and go over the area again. Many lawn care experts on social media recommend checking the height every few passes, especially if your lawn has mixed grass types or uneven terrain.
You should avoid cutting more than one-third of the grass blade in a single mowing session. This practice helps the grass recover quickly and reduces the risk of disease. If your lawn is overgrown, mow at a higher setting first, then lower the height for a second pass a few days later.
You should always mow your lawn when the grass is dry. Wet grass bends under the mower, which leads to uneven cuts and clumping. Dry conditions allow the mower blades to slice cleanly through the grass, leaving a smooth finish.
If you mow wet grass, you risk clogging the mower attachment and leaving ruts in the soil. Wet clippings can stick to the blades and create a mess that is hard to clean. You also increase the chance of slipping or losing control of the mini Excavator.
Here are some signs that your lawn is ready for mowing:
Note: Many experienced operators share videos online showing the difference between mowing wet and dry grass. You can see that dry mowing produces a cleaner cut and healthier lawn.
If rain falls recently, wait until the grass dries before you start. Early afternoon is often the best time, as morning dew has evaporated and the sun is not too harsh. You should also check the weather forecast to avoid mowing right before a storm.
By following these guidelines, you protect your lawn and equipment. Dry mowing helps you achieve a professional look and reduces maintenance needs.
Operating a mini excavator for mowing demands strict attention to safety. You protect yourself and others by following essential protocols every time you work.
You should always wear personal protective equipment (PPE) before starting the machine. PPE shields you from flying debris, loud noise, and accidental bumps. Here is a checklist of what you need:
Wearing this gear reduces the risk of injury. Many experienced operators share photos on social media showing their PPE setups. You can learn from these examples and see how professionals prepare for safe operation.
You must have an emergency plan in place before you begin mowing. Accidents can happen quickly, especially when working with heavy machinery. Prepare by:
If you encounter a hazard, such as a fuel leak or electrical issue, stop the machine immediately. Use your emergency plan to address the situation. Many operators recommend practicing shutdown procedures so you can act fast if needed.
Tip: Review your emergency plan regularly. Update it if your work area or equipment changes.
Protecting your property is just as important as personal safety. You want to avoid damaging your lawn, underground utilities, and nearby structures.
| Safety Action | Benefit |
|---|---|
| Marking utilities | Prevents costly repairs |
| Slow, controlled movement | Reduces turf damage |
| Checking ground stability | Prevents machine rollover |
| Using PPE | Protects operator health |
You can find videos online where operators demonstrate safe mowing techniques. Watching these can help you understand how to protect your property while working.
Note: Always park and shut down the machine properly at the end of the day. This habit keeps your equipment secure and your property safe.
By following these safety tips, you create a safer environment for yourself and your property. You also set a good example for others who may want to try mowing with a mini excavator.
After mowing, you need to clean your mini excavator and mower attachment thoroughly. Dirt, grass clippings, and mud can build up quickly, especially on the undercarriage. Pay extra attention to this area because mud and debris often collect there. If you leave buildup, it can strain rollers and sprockets, leading to costly repairs.
Tip: Regular cleaning helps your equipment last longer and perform better. Many operators share before-and-after cleaning photos on social media to show the difference.
Once you finish cleaning your equipment, inspect your lawn for any issues. Look for uneven cuts, missed patches, or signs of turf damage. Walk the area and note any spots that need extra attention.
| Inspection Task | What to Look For | Action to Take |
|---|---|---|
| Uneven mowing | High or low spots | Adjust mower height next time |
| Turf damage | Ruts, scalping, or torn grass | Repair with soil and seed |
| Debris left behind | Sticks, rocks, or clippings | Remove manually |
| Missed areas | Uncut grass patches | Plan for follow-up mowing |
If you notice problems, take photos and share them with lawn care communities online. You can get advice from experienced users who have solved similar issues.
🧐 Careful inspection after mowing helps you maintain a healthy and attractive lawn.
You should follow a regular maintenance schedule to keep your mini excavator and mower attachment in top condition. Routine checks and timely service prevent breakdowns and extend the life of your equipment.
Note: If you notice slow or jerky movements, unusual noises, overheating hydraulic fluid, or visible contamination in fluid reservoirs, address these issues immediately.
You can find maintenance tutorials and troubleshooting tips on social media platforms and authoritative lawn care websites. Many professionals recommend keeping a maintenance log to track service intervals and repairs.
By following these post-mowing care steps, you protect your investment and ensure your lawn stays healthy and well-groomed.
Even with careful preparation, you may encounter issues while mowing your lawn with a mini excavator. Knowing how to identify and solve these problems helps you maintain both your equipment and your lawn’s appearance. This section covers common troubleshooting scenarios and offers practical solutions.
Attachment problems can disrupt your mowing session. If the mower attachment feels loose or wobbles during operation, stop immediately. Check all locking pins and bolts. Tighten any that have come loose. Inspect the hydraulic connections for leaks or weak pressure. Leaks can reduce performance and create safety hazards. If you notice hydraulic fluid on the ground or attachment, turn off the machine and address the leak before continuing.
Sometimes, the attachment may not respond to control inputs. In this case, review the operator’s manual for troubleshooting steps. Check the quick coupler or pin system for proper engagement. If you see visible wear or damage, replace the affected parts. Many experienced operators share step-by-step repair videos on social media platforms. Watching these can help you understand the process and avoid common mistakes.
Tip: Always test the attachment’s stability before starting each session. This habit prevents accidents and ensures smooth mowing.
Uneven mowing results in a patchy lawn and can signal equipment or technique issues. Several factors can cause this problem. The table below outlines common causes, explanations, and solutions:
| Cause | Explanation | Correction Suggestion |
|---|---|---|
| Dull or Damaged Blades | Blades that are not sharp can tear grass instead of cutting it cleanly, leading to unevenness. | Inspect and sharpen or replace blades as necessary. |
| Uneven Tire Pressure | Inconsistent tire pressure can cause one side of the mower to be lower, resulting in uneven cuts. | Regularly check and adjust tire pressure before mowing. |
| Worn-Out Tires | Tires with worn treads cannot maintain traction, leading to uneven mowing. | Replace worn tires with durable options. |
| Mower Deck Misalignment | Misalignment of the mower deck can tilt it, causing uneven cuts. | Check and adjust the mower deck alignment regularly. |
| Uneven Lawn Surface | Bumps or depressions in the lawn can lead to uneven mowing. | Level the lawn or adjust mowing technique accordingly. |
You should inspect the mower blades before each use. Sharp blades produce a clean, even cut. If you notice torn or frayed grass tips, sharpen or replace the blades. Check tire pressure and tread condition regularly. Properly inflated and maintained tires help the mower stay level. Adjust the mower deck alignment if you see a tilt. For lawns with bumps or dips, slow down and raise the mower slightly to avoid scalping.
🛠️ Many lawn care communities online discuss solutions for uneven cuts. You can find photos and advice from users who have faced similar challenges.
Mechanical issues can interrupt your mowing and may require immediate attention. If the mini excavator loses power or makes unusual noises, stop and inspect the engine. Check fluid levels, including oil and coolant. Low fluids can cause overheating or sluggish performance. Examine hydraulic hoses for leaks or cracks. Replace damaged hoses to prevent further problems.
If the controls feel unresponsive, review the operator’s manual for troubleshooting steps. Sometimes, electrical connections can loosen due to vibration. Secure any loose wires and test the controls again. For persistent issues, consult a certified technician or seek advice from reputable online forums. Many operators share maintenance tips and repair guides on social media, which can help you diagnose and fix common problems.
Note: Keeping a maintenance log helps you track recurring issues and schedule timely repairs.
By addressing these troubleshooting scenarios, you keep your equipment running smoothly and ensure your lawn looks its best. Regular checks and prompt repairs save time and prevent costly breakdowns.
You can mow a lawn with a mini excavator by following these essential steps:
Focus on safety, use proper technique, and maintain your equipment regularly. With careful planning, you achieve a healthy, well-mowed lawn using this powerful method.
You can mow a small lawn, but it is not practical. The machine may damage delicate turf and landscaping. You should use a mini excavator for large, rugged, or overgrown areas.
A flail mower or rotary cutter handles thick brush well. These attachments cut dense vegetation and small saplings efficiently. You should inspect blades before each use for best results.
You should mark all underground utilities before mowing. Use flags or paint to highlight cables and pipes. Always check local utility maps and dig safely.
You can mow gentle slopes if you operate slowly and keep the machine stable. Avoid steep or wet slopes. These conditions increase the risk of tipping.
You should sharpen blades after every 8–10 hours of mowing. Dull blades tear grass and stress your equipment. Inspect blades regularly for nicks or bends.
First, stop the machine and check for loose connections or hydraulic leaks. Inspect the attachment for debris or damage. Consult your manual for troubleshooting steps.
You should avoid mowing wet grass. Wet conditions cause uneven cuts, clog attachments, and damage soil. Wait until the grass and ground are dry.
You need a trailer rated for the machine’s weight. Secure the excavator with chains and follow local transport laws. Always load and unload on level ground.


-1.png)