Welcome to Shandong Qilu Industrial Co., Ltd

 English
 Arabic
 Bulgarian
 Bengali
 Czech
Czech
 Danish
 German
 Greek
Greek
 Spanish
 Finnish
 French
 Hindi
Hindi
 Croatian
 Hungarian
 Indonesian
 Italian
 Japanese
 Korean
 Lithuanian
 Dutch
Dutch
 Norwegian
 Polish
 Portuguese
 Romanian
 Russian
 Slovak
 Slovenian
 Swedish
 Thai
Thai
 Turkish
 Ukrainian
 Vietnamese
 Tagalog
 Malay
Malay
 Estonian
 Catalan
 Latvian
 Urdu
Urdu
 Serbian
 Persian
 Swahili
 Albanian
 Armenian
 Icelandic
 Bosnian
 Luxembourgish
 Afrikaans
English Arabic
Bulgarian
Bengali
Czech
Danish
German
Greek
Spanish
Finnish
French
Hindi
Croatian
Hungarian
Indonesian
Italian
Japanese
Korean
Lithuanian
Dutch
Norwegian
Polish
Portuguese
Romanian
Russian
Slovak
Slovenian
Swedish
Thai
Turkish
Ukrainian
Vietnamese
Tagalog
Malay
Estonian
Catalan
Latvian
Urdu
Serbian
Persian
Swahili
Albanian
Armenian
Icelandic
Bosnian
Luxembourgish
Afrikaans
Afrikaans
English Arabic
Bulgarian
Bengali
Czech
Danish
German
Greek
Spanish
Finnish
French
Hindi
Croatian
Hungarian
Indonesian
Italian
Japanese
Korean
Lithuanian
Dutch
Norwegian
Polish
Portuguese
Romanian
Russian
Slovak
Slovenian
Swedish
Thai
Turkish
Ukrainian
Vietnamese
Tagalog
Malay
Estonian
Catalan
Latvian
Urdu
Serbian
Persian
Swahili
Albanian
Armenian
Icelandic
Bosnian
Luxembourgish
Afrikaans
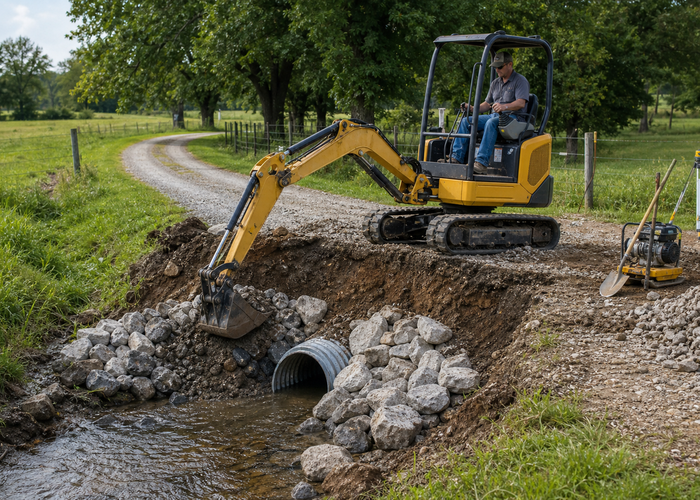
Mini Excavator Culvert Repair Planning for Farm Lane Drainage
A practical guide to mini excavator culvert repair planning for farm lanes, covering bedding, outlet shape, traffic access, and finish-condition decisions.
Mini Excavator Culvert Repair Planning for Farm Lane Drainage is rarely about digging speed alone. A mini excavator may have enough reach and bucket force, but the job still turns poor if the operator ignores pipe bedding, traffic access during the repair, and how the inlet and outlet will handle water once the lane is reopened or assumes the support plan can be improvised later. That is why buyers studying the excavator lineup should evaluate the full work sequence instead of only comparing tonnage.
The practical questions come first: where will spoil go, how will the machine approach the cut, what material has to arrive before backfill or finish work, and which step is the most expensive to redo? The excavator application solutions page helps because it frames the machine as a job-planning tool rather than a standalone digging number.
That mindset matters especially when a buyer is comparing a compact machine from the mini excavator manufacturer page or the broader Chinese mini excavator manufacturer page against the site conditions they actually face. Good results come from balancing reach, machine stance, material flow, and cleanup strategy from the start.
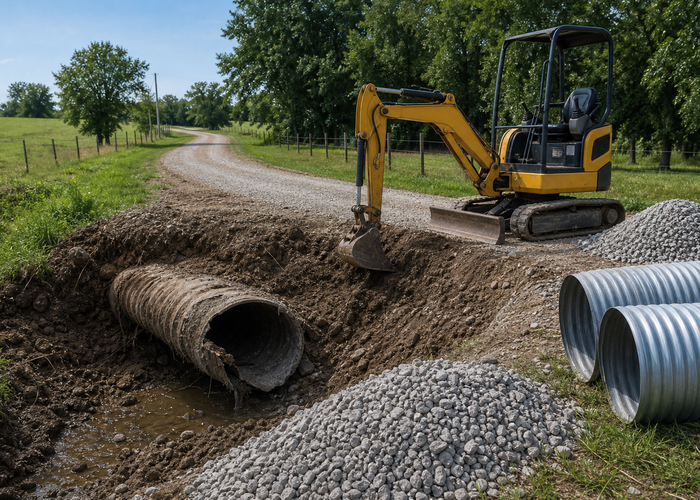
Why The Work Starts Before The First Bucket
A culvert repair often looks simple from the road, but the failure usually involves water direction, bedding support, shoulder stability, and how the lane ties back into the ditch or field edge That is why excavation planning should begin with utility locate, access, spoil placement, and finish condition rather than with engine speed or bucket cycle time.
The OSHA trenching fact sheet Trenching and Excavation Safety and the standard 29 CFR 1926.651 both reinforce the same message: soil condition, spoil placement, access, and protective decisions are part of the work itself. They are not paperwork to finish after the machine arrives.
Use The Mini Excavator Where Precision Saves Rework
A compact excavator earns its place when the job needs controlled shaping and repeatable passes. Culvert work rewards accurate depth control, clean pipe seat preparation, and careful shaping at the inlet and outlet where erosion or ponding is most likely to show up first A sloppy first cut usually forces more handwork, more cleanup, or a poor finish that stays visible after the job is done.
Let Drainage, Utilities, And Cleanup Shape The Plan
Stone, pipe, erosion material, and traffic-control items should already be positioned so the excavator does not waste time waiting while an open farm lane remains unusable That is also why the most useful excavator plan often includes support equipment, marked staging space, and a clear finish target before digging starts.
Decide How Water Will Move While The Repair Is Open
A culvert repair can also fail during the repair window itself if runoff has nowhere sensible to go. Even on small lanes, operators should ask where the next irrigation event or quick storm will send water if the old pipe is already out and the new one is not yet bedded. Temporary diversion, a staged closure, or a shorter open-cut sequence can matter more than saving ten minutes of digging time.
That temporary-water question is one reason good operators do not treat culvert replacement like a pure trenching exercise. The excavation is only one phase inside a drainage system that still wants to move water, protect the shoulder, and keep access usable. Thinking about temporary flow before the first bucket often prevents the kind of rushed finish work that leaves erosion scars beside an otherwise acceptable pipe install.
Research And Checks That Should Happen Up Front
If the cut is near buried services or structures, the job starts with 811 utility locating. No trench, swale, or culvert repair is worth guessing at buried lines. Marking and route confirmation should happen before the first pass.
When water movement is part of the problem, broader drainage references help the operator think correctly about grade and outlet behavior. The Illinois guide on subsurface drainage, the NRCS material on drainage water management, and Wisconsin Extension’s notes on maintaining tile drainage systems all push the same principle: water control succeeds when grade, outlet, and maintenance access are planned together.
For smaller property work, stormwater guidance on rain-garden finish quality is also a useful reminder that finish condition matters. Excavation that looks clean on day one but sheds water badly later is not a successful job.
Once the digging begins, the machine should work from stable positions and repeatable passes. The operator should keep checking whether the bedding, pipe line, and shoulder shape still match the runoff target instead of focusing only on how quickly the old pipe comes out That reduces the temptation to overreach, cut blind, or use the bucket to fix approach mistakes that should have been solved with better staging.
The operator should also keep one eye on the finished condition. Traffic surfaces and ditch edges need to be reviewed during the repair because a lane can reopen looking neat while still holding the next storm in the wrong place Rechecking grade, runoff direction, and material placement during the middle of the work is cheaper than discovering a low spot or blocked outlet after the machine has already moved away.
A good excavator day usually feels organized rather than dramatic. The machine stays on firm ground, the spoil stays where it belongs, and the operator is making small precise corrections instead of fighting a poorly planned cut.
A Practical Excavator Workflow
| Project step | Mini excavator role | Decision to verify before continuing |
|---|---|---|
| Inspect failure and runoff path | Identify why the culvert failed and where water must leave the lane | The repair solves the real drainage problem |
| Stage pipe and bedding | Prepare stone, pipe, and erosion materials before the old culvert comes out | The excavator can move steadily through the replacement |
| Install and shape | Set bedding, pipe, shoulder, and ditch transitions carefully | The lane can reopen with stable support |
| Verify after cleanup | Check outlet, shoulder runoff, and surface restoration | The repair is ready for rain and traffic |
This workflow keeps the mini excavator on the tasks that reward precision and keeps the support decisions visible instead of hidden. It also makes it easier to stop and correct the plan before a small problem becomes a finished-condition problem.
How Site Conditions Change The Excavator Plan
Site conditions can shift quickly even on small properties. A shoulder that seemed firm may soften after a few passes, spoil can start crowding the cut more than expected, or the outlet condition can reveal that water was moving differently than the owner assumed. That is why the operator should pause and reassess rather than trusting the first layout forever.
When those changes appear, the most productive response is usually to move the machine, restage material, or redefine the finish target slightly before continuing. An excavator that keeps working from a compromised stance often creates a larger correction later, especially on drainage and utility jobs where the final shape matters as much as the excavation volume.
Know When The Job Needs Another Step
Some cuts also need help from another process. The site may need compaction, erosion control, geotextile, gravel, or surface restoration support that the excavator alone cannot provide. Recognizing that early keeps the machine from being used as a substitute for better sequencing and gives the finished job a much better chance to last.
Coordinate The Pipe And Stone Sequence Before Exposure
One of the fastest ways to lose quality on culvert work is exposing the excavation before the replacement materials are genuinely ready. Pipe length, bedding stone, couplers, geotextile, and outlet protection should all be staged close enough that the excavator can keep the opening small and controlled. Waiting with an open lane while someone searches for a fitting or repositions a pile of stone creates exactly the kind of soil disturbance and shoulder damage the repair was supposed to solve.
That same sequencing rule helps buyers evaluate machine size honestly. A compact excavator that can work in a tidy staged zone with the right materials beside it may outperform a larger machine that needs more approach space and creates more cleanup. Productivity on culvert repair comes from flow of work, not from raw bucket capacity alone.
What Good Operators Write Down Afterward
Useful notes include the bucket width that held grade best, where spoil had to be moved to keep the edge clear, which pass direction gave the cleanest finish, and how much room the machine really needed around the site constraints. Those details shorten the next setup and help owners compare whether a different machine size would improve the same task.
Finish-condition notes matter just as much. If the inlet needed more stone, if the swale needed a flatter transition for mowing, or if the trench repair looked better from one stance than another, record that while the work is still fresh. That is how a compact excavator turns from a general digging tool into a predictable part of a property-improvement system.
Those notes also help buyers compare machines honestly. The best excavator for repeated property drainage work is not always the largest one available; it is often the unit that lets the operator hold grade, protect the surface, and leave a cleaner finish with less repositioning.
Why Maintenance Access Matters After The Repair Looks Finished
A culvert is not successful simply because traffic can cross it again. The site also has to stay inspectable after the machine leaves. If vegetation, shoulder shape, or outlet protection make it difficult to see whether sediment is building up, then the owner is more likely to miss the early warning signs that turn a minor maintenance task into another excavation job.
That is why good culvert planning includes future access for mowing, ditch cleaning, and visual checks after storms. A slightly cleaner shoulder edge, a visible outlet line, or a better place to stand during inspection may seem minor on install day, but those details are what make long-term maintenance practical for the property owner.
Buyers who think that way usually choose machines and workflows more carefully. They stop judging the excavator by how fast it opened the lane and start judging it by whether the repaired site will keep working through weather, traffic, and routine property maintenance.
A Buyer Checklist Before Choosing The Excavator
Before committing to a machine, buyers should ask how often the excavator will face tight approaches, finished surfaces, drainage-sensitive work, or property owners who care deeply about how the site looks afterward. Those realities often matter more than maximum digging speed because they shape whether the operator can work precisely without creating unnecessary repair work.
It is also worth comparing how the machine fits the support plan. A compact excavator that works well with the available trailer, support tractor, gravel delivery route, or staging space may outperform a larger unit that looks stronger but forces awkward logistics. On small-property jobs, access and cleanup often decide the true productivity of the machine.
That checklist keeps the buying decision practical. The goal is not simply to own more excavator, but to own the unit that handles the recurring property tasks with the least strain on the operator and the least rework on the site.
Mistakes That Create Expensive Rework
They Let The Machine Decide The Layout
They focus on the pipe alone and forget that the inlet, outlet, and shoulder transitions are what decide whether the repair lasts through the next heavy rain The better approach is to define the finish target, then decide where the excavator should stand and where each bucket of material should go.
They Underestimate The Exit Condition
They open the lane fully before the repair surface, bedding support, and erosion protection are truly ready for traffic and runoff A clean finish needs as much attention as the opening cut because drainage, access, and maintenance all depend on what the site looks like after the excavator leaves.
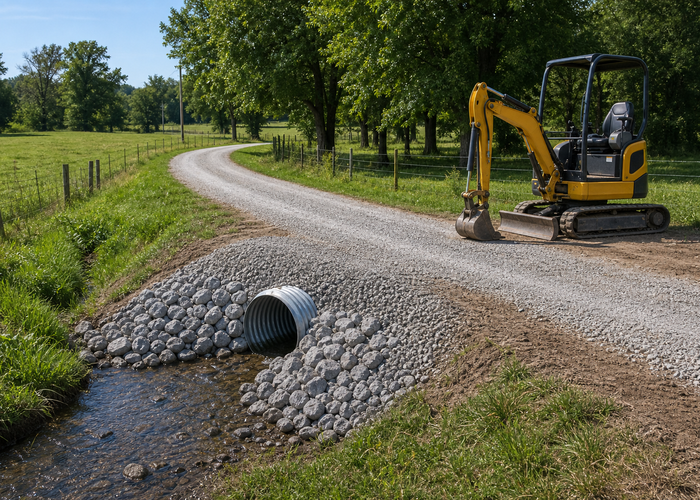
Documenting what worked is also worth the time. Bucket width, pass direction, spoil route, stone staging, and the point where the operator checked grade are all reusable notes for the next similar job.
That record becomes even more useful when buyers compare different machine sizes. A compact unit from the 3.5T excavator class might be the better choice if it lets the operator hold grade cleanly and stand safely, even if a larger machine could move more soil in a straight open cut.
Owners who judge excavators by finish quality, not just by bucket speed, usually make better purchases. That practical ownership lens is why articles like this belong on the QiLu Machinery blog and in real job planning notes.
How To Judge Whether The Finished Job Really Passed
A finished excavation should be judged by what happens after the machine leaves. Does water move where it should, can the property owner maintain the area, and does the site look intentionally completed rather than merely disturbed? Those questions are important because many excavation jobs fail only after weather or traffic tests the result.
Operators should also check whether cleanup and restoration match the owner’s daily use of the site. A swale that is impossible to mow, a culvert outlet that traps debris, or a trench crossing that still settles under traffic is a sign that the finish plan was incomplete. The best excavator work solves the drainage or utility need without creating a new maintenance burden beside it.
When buyers use that standard, they start comparing machines against long-term property performance instead of one day’s digging pace. That usually leads to smarter choices about bucket size, machine class, and which jobs truly fit a compact excavator.
It also reminds the operator that cleanup, runoff behavior, and access after the repair are part of the product being delivered. A site that still works well a month later is the strongest proof that the excavator plan was sound.
The same review should include the lane user experience. If drivers now cross the repair smoothly, runoff leaves the road without ponding, and the outlet can be checked without climbing through unstable edges, the repair is doing more than merely replacing pipe. EPA guidance on stormwater finish control is a helpful reminder that the landscape around the structure still has to direct water well after the bucket work is done. It is restoring the lane as a working part of the property, which is the outcome buyers should care about when they compare excavator options.
FAQ
What makes mini excavator culvert repair difficult?
The excavation is only one part of the task. Bedding, pipe line, shoulder rebuild, traffic access, and erosion control all have to work together for the repair to last.
Why does outlet shape matter so much?
Because the outlet decides how water leaves the culvert after a storm. A poor outlet can undermine the shoulder or trap sediment even when the pipe itself is installed correctly.
Should a farm lane stay open during culvert work?
Only if a safe and realistic temporary traffic plan exists. If not, controlled closure and staged repair are often better than trying to squeeze traffic through a poorly protected work zone.
What is the most common culvert repair mistake?
Treating the new pipe as the finish line. The repair passes only when the lane, ditch, and runoff path all work together again.