Welcome to Shandong Qilu Industrial Co., Ltd

 English
 Arabic
 Bulgarian
 Bengali
 Czech
Czech
 Danish
 German
 Greek
Greek
 Spanish
 Finnish
 French
 Hindi
Hindi
 Croatian
 Hungarian
 Indonesian
 Italian
 Japanese
 Korean
 Lithuanian
 Dutch
Dutch
 Norwegian
 Polish
 Portuguese
 Romanian
 Russian
 Slovak
 Slovenian
 Swedish
 Thai
Thai
 Turkish
 Ukrainian
 Vietnamese
 Tagalog
 Malay
Malay
 Estonian
 Catalan
 Latvian
 Urdu
Urdu
 Serbian
 Persian
 Swahili
 Albanian
 Armenian
 Icelandic
 Bosnian
 Luxembourgish
 Afrikaans
English Arabic
Bulgarian
Bengali
Czech
Danish
German
Greek
Spanish
Finnish
French
Hindi
Croatian
Hungarian
Indonesian
Italian
Japanese
Korean
Lithuanian
Dutch
Norwegian
Polish
Portuguese
Romanian
Russian
Slovak
Slovenian
Swedish
Thai
Turkish
Ukrainian
Vietnamese
Tagalog
Malay
Estonian
Catalan
Latvian
Urdu
Serbian
Persian
Swahili
Albanian
Armenian
Icelandic
Bosnian
Luxembourgish
Afrikaans
Afrikaans
English Arabic
Bulgarian
Bengali
Czech
Danish
German
Greek
Spanish
Finnish
French
Hindi
Croatian
Hungarian
Indonesian
Italian
Japanese
Korean
Lithuanian
Dutch
Norwegian
Polish
Portuguese
Romanian
Russian
Slovak
Slovenian
Swedish
Thai
Turkish
Ukrainian
Vietnamese
Tagalog
Malay
Estonian
Catalan
Latvian
Urdu
Serbian
Persian
Swahili
Albanian
Armenian
Icelandic
Bosnian
Luxembourgish
Afrikaans

Compact Tractor Post Hole Digger Setup: Auger Size, PTO Rhythm, and Utility Checks Before Fence Work
A practical guide to compact tractor post hole digger setup, covering auger size, PTO rhythm, hole spacing, and utility checks before fence work begins.
Compact Tractor Post Hole Digger Setup: Auger Size, PTO Rhythm, and Utility Checks Before Fence Work matters because this kind of job exposes small setup mistakes quickly. A compact tractor can look capable in the yard and still work poorly once a fence line with repeated hole spacing, changing soil, and buried-service uncertainty starts. Operators who browse the farm tractor range often compare horsepower first, but this job usually depends more on auger diameter, hole sequence, and how the operator will start and stop each hole cleanly and the order in which the operator sets the machine up.
The right choice is rarely a single spec-sheet number. straight usable post holes without driveline abuse or rushed corrections depends on ballast, tire grip, PTO behavior, ground condition, and whether the operator can maintain a repeatable working rhythm. The machine selection ideas on the tractor application solutions page are useful because they frame the tractor as a work system instead of a loose list of features.
That is also why buyers comparing a utility model like the QL-904B tractor with other machines in the QiLu Machinery product lineup should think about the full task: how the implement starts, how the tractor turns, where weight transfers during the job, and which checks need to happen before the first pass. Those details are what separate a smooth workday from avoidable downtime or unsafe improvisation.
Why This Job Punishes a Casual Setup
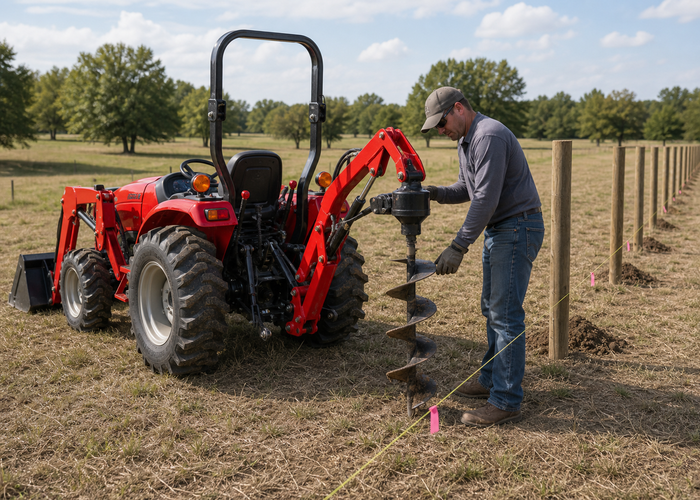
The task becomes difficult when the operator assumes the tractor can simply pull or spin its way through it. Auger work looks simple until the operator meets rocks, root zones, changing soil moisture, or a hole that starts off-line and becomes harder to correct with every inch of depth That is why the OSHA guidance on agricultural tractor operation and Penn State Extension’s tractor safety overview both stay focused on stability, shielding, operator attention, and terrain instead of treating the job as a pure power question.
The same lesson appears in the University of Minnesota’s tractor safety guidance and the CDC’s agricultural injury resources: once an operator works on uneven ground, near rotating equipment, or around repeated transport and hookup steps, discipline matters more than confidence. A tractor that is technically big enough can still be a poor match if the tires, speed range, implement angle, or travel path are wrong.
Match The Tractor To The Actual Working Pace
Start by deciding how slowly or steadily the tractor must work, not how fast it could work. The correct PTO rhythm is the one that lets the auger bite predictably, clear soil, and stop cleanly without bouncing the three-point or forcing the operator into hurried lever movements When the job has a clear target pace, the operator can choose the gear, engine speed, ballast level, and turning pattern that keep the machine composed rather than constantly correcting.
Build The Day Around Ground Condition And Clearance
Ground condition often decides the setup before the implement even begins. Fence lines often combine buried utilities, old wire, roots, and slope changes, so the route must be marked and the tractor stance chosen before the first hole begins If the approach path is soft, rough, or narrow, that path should influence tire choice, ballast, and route planning before the implement enters the work zone.
Checks To Make Before The First Pass
Before starting, confirm the site, the route, and the support plan. Mark the line, confirm post spacing, and decide where the tractor will approach each hole so that repeated backing and turning do not destroy the alignment If the job could expose buried utilities or hidden edges, start with 811 utility locating and visible marking rather than assuming the work area is clear.
Then confirm operator protection and implement condition. Confirm auger point condition, shear protection, PTO shielding, top-link geometry, and whether the operator has a clean plan for clearing a hole if spoil or roots bind the bit That is the practical value of revisiting the OSHA and extension references before a seasonal task resumes: they force the operator to ask whether the setup is truly ready or merely familiar.
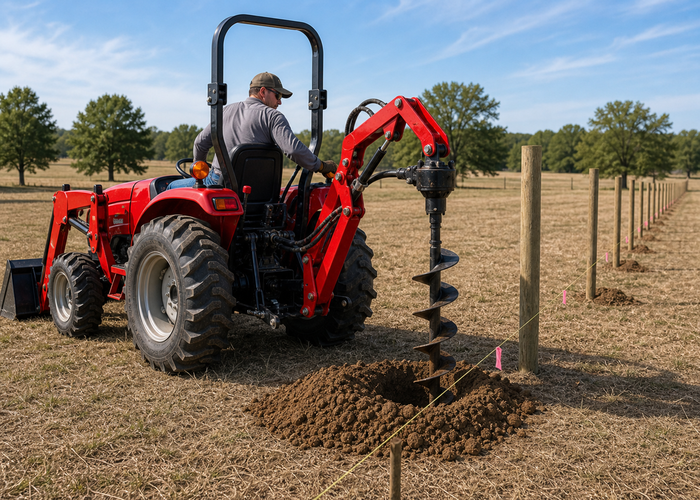
Finally, decide what a clean first hour looks like. A good first hole should show straight entry, stable PTO behavior, and enough spoil clearance that the next hole can begin without crowding the work area A tractor setup should be judged by repeatability: can the machine keep the same line, the same PTO rhythm, and the same operator visibility without extra strain?
Once the first pass begins, the operator should stay disciplined about pace. If the auger begins wandering, the operator should stop, lift, and correct early instead of drilling deeper into a bad line that will not hold a post well This is where many tractors perform well on paper but poorly in practice, because the operator keeps adjusting rather than following a stable plan.
Load transfer also needs attention during the working run. The work pace should stay slow enough that the operator can feel a root, rock, or sudden soil change before it becomes a three-point shock or a driveline problem Small corrections made early are cheaper than one large correction made after the implement or trailer is already out of line.
If the setup is right, the job starts to look uneventful. The tractor tracks cleanly, the implement stays predictable, and the operator is free to watch the work rather than fight the machine. That is usually the clearest sign that the machine choice and setup order were correct.
A Practical Workflow For The Job
| Work stage | What the tractor must do | What to verify before moving on |
|---|---|---|
| Mark the fence line | Confirm spacing, gate locations, and machine approach direction | The operator can repeat the same hole pattern without guesswork |
| Set the auger and PTO plan | Choose bit diameter, depth target, and a steady engagement rhythm | The tractor enters each hole with the same controlled setup |
| Drill the test holes | Check vertical entry, spoil clearance, and soil behavior | Any setup flaw is caught early |
| Continue the production line | Keep hole sequence and cleanup organized | The fence build stays straight and efficient |
This sequence is useful because it keeps the operator from skipping ahead. A tractor that is rushed into the main task without those checkpoints often creates the very delays it was supposed to prevent.
How Conditions Change The Setup Midday
Weather and surface change matter even after the machine is already working. A dry lane can soften after irrigation, a pasture edge can hide more moisture than the center, and a transport ramp that felt secure in the morning can become slick in the afternoon. Operators should therefore treat the first successful pass as a baseline, not as a guarantee that the same settings will still be right later in the day.
That is also why it helps to pause after the first third of the job and ask whether the tractor is still balanced, whether tire grip still feels the same, and whether the implement is still leaving the intended result. If those answers change, the right reaction is to adjust the plan deliberately instead of pushing through because the machine has already started.
Know When A Different Tool Is Better
A disciplined operator also knows when the tractor should not solve the whole problem alone. Some jobs need a different attachment, more staging help, drier ground, or another machine for the tightest or steepest section. Changing the tool or delaying the task is not lost time if it prevents damage, unsafe operation, or an expensive cleanup later.
What To Record For The Next Job
One of the most useful ownership habits is writing down what the successful setup actually was. Deck height, auger diameter, tie-down order, ballast amount, and the travel speed that felt stable are all details worth saving. Those notes turn one good day into a repeatable operating standard instead of forcing the next operator to relearn the job from memory.
That record should also include what changed the plan. If a soft shoulder forced a new route, if taller grass demanded extra overlap, or if a trailer needed a different load position than expected, write that down too. Those are the lessons that improve future machine selection and help buyers compare whether a different tractor or attachment would make the work easier.
Over time, that kind of practical record becomes more valuable than marketing language because it connects the tractor directly to jobs the owner really performs. It is also the clearest way to decide whether the current machine still fits the workload or whether another model in the same product family would reduce strain, downtime, or safety compromises.
A Buyer Checklist Before Choosing The Tractor
Before buying or assigning a tractor to this job, ask a few blunt questions. Can the machine hold the correct working speed without forcing the operator to rush? Can the tires, ballast, and hitch geometry support the actual ground condition? Can the operator see the critical part of the task clearly enough to work calmly? Those questions tend to reveal fit much faster than another horsepower comparison.
It also helps to compare the tractor against the ownership pattern around it. If the same machine must handle mowing, fence work, transport, loader chores, and seasonal support, then setup flexibility matters as much as raw strength. That is why attachment changeover time, storage space, and operator familiarity deserve a place in the buying decision too.
Operators who use that checklist usually make more durable choices because they are comparing the tractor to recurring jobs instead of to advertising language. A machine that feels slightly less impressive on paper can still be the more valuable purchase when it performs the actual route, attachment, and terrain sequence with fewer compromises.
Where Owners Commonly Go Wrong
They Size The Tractor Around The Marketing Number
They choose auger size by guesswork and end up with holes that are too loose for the post system or too aggressive for the tractor and soil conditions That is why the product application solutions pages are more useful than broad advertising language: they push buyers back toward job fit, terrain, and attachment behavior.
They Treat The Support Plan As Optional
They skip utility marking and layout discipline because the fence line looks obvious, then waste time or create risk when the first difficult hole exposes the weak plan Support items such as markers, chains, extra pins, tie-down gear, or cleanup tools should be loaded deliberately rather than borrowed from memory once the tractor is already in position.
Another frequent mistake is ignoring the second half of the job. Operators often think about the opening move and forget about the turns, reloads, cleanup, or transport steps that happen later. Yet those later steps are where fatigue, rushed decisions, and poor visibility start to matter most.
It also helps to record the setup that worked. Tire pressure, ballast amount, hitch setting, travel speed, and a note about ground condition make the next job faster to prepare. That practical record is more valuable than vague memory, especially when the tractor rotates among several operators or seasonal tasks, and the safety reminders in Ohio State’s post-hole digger practices reinforce why repeatable setup matters once the job extends across a full fence run.
Buyers who want a tractor that stays useful across several work patterns should keep comparing the machine against real applications rather than just against other spec sheets. The QiLu Machinery blog is the right place to keep that kind of practical decision framework because it ties the machine back to daily ownership instead of abstract advertising claims.
How To Keep Hole Quality Consistent Across A Long Fence Run
Long fence jobs usually expose a second layer of setup problems that a short demonstration never reveals. The first ten holes may look acceptable, but the next twenty can drift once the operator gets tired, the spoil piles crowd the line, or the tractor starts approaching from poorer angles. That is why consistency should be planned like part of the setup itself. A reliable operator decides where completed spoil will go, how often the line will be rechecked with a tape or string, and where the tractor will pause for a fast inspection instead of assuming the pattern will stay accurate on its own.
Gate openings, corner braces, and end assemblies deserve their own drilling plan rather than being treated like ordinary line posts. Those locations often need larger holes, more careful squaring, or better spoil cleanup because they will carry more tension and usually get more visual attention once the fence is finished. When buyers compare tractors for property work, this is an important detail to remember: the machine should not only handle repetitive easy holes, it should also stay composed when the job slows down for the holes that matter most to the finished structure.
Transport and staging also affect hole quality more than many operators expect. If the tractor has to cross a ditch, reverse uphill, or squeeze between stacked posts and wire bundles after every few holes, the crew tends to rush the alignment check just to keep moving. A better plan keeps posts, tools, and cleanup equipment placed ahead of the machine so the operator can drill, lift clear, verify the line, and move to the next mark without improvising around clutter. That is how a moderate-size tractor often outperforms a seemingly larger machine that is harder to position calmly in a tight work corridor.
End-of-day discipline matters too. Before leaving the site, note which auger diameter matched the soil best, where the line became harder to hold, and whether the tractor needed more or less ballast once the route changed. Those short notes make tomorrow’s restart cleaner and help the owner decide whether the current tractor truly fits fencing work or whether another hitch, tire, or tractor class would reduce fatigue and rework over a full season of property improvements.
It is also smart to treat the first restart after a break as another test sequence rather than assuming the tractor will resume perfectly on the next mark. A short check of PTO feel, vertical entry, and line position after lunch or after a relocation catches small setup drift before it spreads through the remaining holes. That habit protects both fence quality and operator confidence on longer properties.
FAQ
What matters more, auger size or tractor power?
Auger size and soil match matter first. A compact tractor can handle post-hole work well when the auger diameter, PTO rhythm, and route are chosen for the actual fence system and soil condition.
Why should fence work start with 811?
Because buried utilities are often exactly where a fence line seems convenient. Marking first changes hole placement, gate-post planning, and how confidently the operator can work.
How should the first few holes be used?
As test holes. They show whether the auger is entering straight, whether spoil is clearing, and whether the tractor stance and top-link geometry need correction before the full line is drilled.
What is the biggest mistake in post-hole digging?
Trying to work too fast. Rapid PTO inputs and rushed corrections are how holes wander, driveline stress rises, and the fence line becomes harder to straighten.