Welcome to Shandong Qilu Industrial Co., Ltd

 English
 Arabic
 Bulgarian
 Bengali
 Czech
Czech
 Danish
 German
 Greek
Greek
 Spanish
 Finnish
 French
 Hindi
Hindi
 Croatian
 Hungarian
 Indonesian
 Italian
 Japanese
 Korean
 Lithuanian
 Dutch
Dutch
 Norwegian
 Polish
 Portuguese
 Romanian
 Russian
 Slovak
 Slovenian
 Swedish
 Thai
Thai
 Turkish
 Ukrainian
 Vietnamese
 Tagalog
 Malay
Malay
 Estonian
 Catalan
 Latvian
 Urdu
Urdu
 Serbian
 Persian
 Swahili
 Albanian
 Armenian
 Icelandic
 Bosnian
 Luxembourgish
 Afrikaans
English Arabic
Bulgarian
Bengali
Czech
Danish
German
Greek
Spanish
Finnish
French
Hindi
Croatian
Hungarian
Indonesian
Italian
Japanese
Korean
Lithuanian
Dutch
Norwegian
Polish
Portuguese
Romanian
Russian
Slovak
Slovenian
Swedish
Thai
Turkish
Ukrainian
Vietnamese
Tagalog
Malay
Estonian
Catalan
Latvian
Urdu
Serbian
Persian
Swahili
Albanian
Armenian
Icelandic
Bosnian
Luxembourgish
Afrikaans
Afrikaans
English Arabic
Bulgarian
Bengali
Czech
Danish
German
Greek
Spanish
Finnish
French
Hindi
Croatian
Hungarian
Indonesian
Italian
Japanese
Korean
Lithuanian
Dutch
Norwegian
Polish
Portuguese
Romanian
Russian
Slovak
Slovenian
Swedish
Thai
Turkish
Ukrainian
Vietnamese
Tagalog
Malay
Estonian
Catalan
Latvian
Urdu
Serbian
Persian
Swahili
Albanian
Armenian
Icelandic
Bosnian
Luxembourgish
Afrikaans
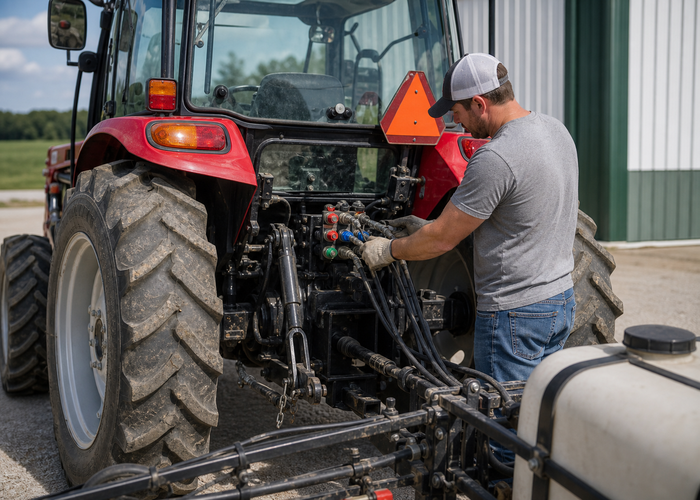
How to Match Tractor Hydraulic Flow to Loaders, Mowers, and Sprayers
A practical guide to matching tractor hydraulic flow, pressure, couplers, hoses, and attachment requirements for loaders, mowers, sprayers, and other farm tools.
A tractor hydraulic flow attachments decision should begin before anyone buys a mower, loader, sprayer, grapple, or backhoe. Hydraulic flow, pressure, valve type, coupler size, hose routing, implement weight, and operator skill all shape whether an attachment feels smooth or frustrating. Buyers often ask about horsepower first, but many modern farm jobs depend just as much on whether the tractor can move oil at the rate the tool expects.
For QiLu Machinery customers comparing the farm tractor product range with practical field tasks, the useful question is simple: what attachment will run today, and what attachment might be added next season? A tractor that can pull well may still disappoint if the loader cycles slowly, a hydraulic mower stalls, or a sprayer boom reacts unevenly.
This guide explains how to match hydraulic capacity to real work without turning the decision into a confusing parts catalog. It also points operators toward safe setup habits supported by resources such as OSHA tractor operation guidance and Penn State Extension tractor safety material.
Understand What Hydraulic Flow Actually Does
Hydraulic flow is the volume of oil the system can move in a set time. Pressure is the force available in that circuit. An attachment needs both, but not in the same way. Flow influences speed, cycle time, motor rpm, and how quickly cylinders extend or retract. Pressure influences whether the system can do the work against load. A tool that needs high flow will not become efficient simply because the tractor has enough engine power.
A front loader is a familiar example. If flow is low, the loader may lift with enough force but move slowly. A hydraulic motor attachment is different because motor speed can depend directly on flow. A mower, broom, auger, or sprayer pump may operate poorly if the tractor cannot supply the required oil flow continuously.
Open Center, Closed Center, and Real Attachment Behavior
Operators do not always need to memorize every hydraulic design term, but they should know that not all systems behave alike. Some systems circulate oil continuously until a valve is used. Others respond on demand. Attachment manuals may specify flow range, pressure, return line needs, case drain requirements, or continuous-duty limits. Those lines deserve attention before the tool is connected.
The wrong match can create heat, slow response, hose stress, weak performance, or premature wear. Heat is especially important because hydraulic oil that runs too hot loses efficiency and shortens component life. If an attachment is expected to run for long periods, the tractor must be able to supply the requirement without constantly pushing the system beyond a comfortable range.
Match the Attachment Before Matching the Field
Begin with the task list. Loader work, mowing, spraying, post-hole digging, bale handling, and roadside maintenance all place different demands on the tractor. A buyer looking at the QL 60HP tractor or QL 904B tractor should compare the implement requirements against the tractor specifications, not just against the acreage size.
Write down required flow, pressure, coupler type, number of rear remotes, loader valve needs, and whether the implement uses a hydraulic motor. Then ask whether the tractor can support that tool while also handling steering, lifting, and travel. A setup can look acceptable on paper until the operator tries to lift, turn, and power the implement at the same time.
If several attachments are planned, rank them by hydraulic demand. The highest-demand tool often decides whether the tractor package is adequate. A simple rear blade may need little hydraulic capacity. A loader, hydraulic mower, or sprayer system may become the real test.
Setup Checks Before Connecting Hydraulic Attachments
Cleanliness is the first setup rule. Dirt around couplers, hose ends, and caps enters the system easily and can damage valves. Wipe fittings before connection, replace missing caps, and store hoses off the ground. A few seconds of cleaning can prevent hours of troubleshooting later.
Hose routing is the second rule. Hoses should not stretch at full lift, rub against tires, bind in a turn, hang near the PTO, or pinch under the implement frame. Cycle the attachment slowly while parked and watch the hoses through the range of motion. If the route looks barely acceptable in the yard, it will be worse in rough field work.
Pressure trapped in hoses can make connection difficult. Follow the tractor and implement instructions for relieving pressure safely. Never strike couplers, force fittings with unsafe tools, or put hands near a suspected pinhole leak. High-pressure fluid injection injuries are serious, and any suspected injection injury needs urgent medical attention.
NIOSH agricultural safety resources and university extension materials keep emphasizing basic machine safety because small shortcuts become serious around hydraulic power. A clean, slow, visible setup routine is not overcautious. It is how operators avoid surprises when the tool is finally under load.
Symptoms of a Poor Hydraulic Match
Watch for slow loader cycles, weak lift after the oil warms, attachment motors that bog down, noisy pumps, foaming oil, jerky cylinder motion, overheating, repeated hose failures, or controls that feel inconsistent. One symptom may have several causes, so the operator should record the machine hours, oil temperature, attachment, load, ground condition, and what changed before the problem appeared.
Do not solve every problem by increasing engine speed. Higher rpm may improve flow in some situations, but it can also increase heat, noise, and wear if the attachment is mismatched. The better answer is to confirm specifications, inspect filters and oil condition, check couplers, and verify whether the tool is within the tractor system capacity.
Planning Resources and Link-Rich Field Notes
For internal planning, compare hydraulic attachment needs against QiLu Machinery’s tractor application solutions, all machinery products, and product application solutions pages. Those pages help connect a tractor choice to the job sequence rather than treating the machine as a standalone purchase.
For outside reading, combine the attachment manual with University of Missouri farm machinery maintenance guidance, University of Minnesota tractor safety resources, and OSHA agricultural tractor operation guidance. These sources do not replace the manufacturer manual, but they reinforce the same field habits: inspect first, connect cleanly, protect the operator, and stop when the machine gives a warning.
A Simple Hydraulic Matching Checklist
Confirm the attachment flow range, pressure requirement, valve type, number of remotes, coupler size, return line needs, hose length, duty cycle, and cooling expectations. Then confirm the tractor specification, test movement at low load, inspect for heat or leaks, and write down any change in performance during the first hour of use.
The best hydraulic setup is not the one with the most impressive number. It is the one that runs the intended attachment smoothly, stays cool enough, keeps hoses protected, and lets the operator work without fighting the controls. That is the difference between a tractor that merely fits an attachment and one that supports the job all day.
Field Example: Loader, Sprayer, and Mower on One Tractor
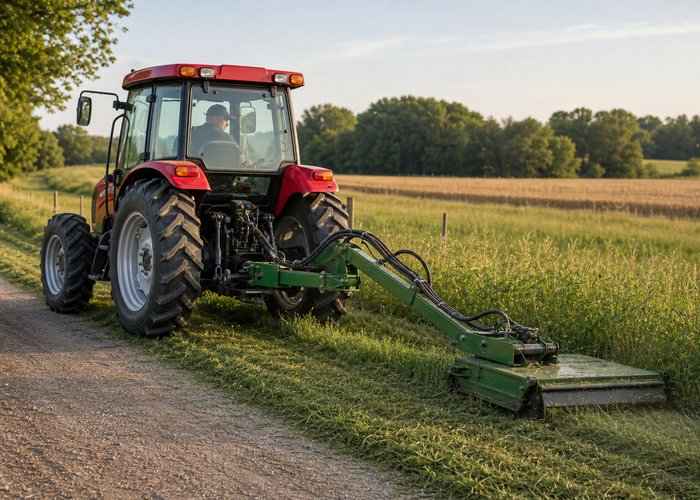
Imagine one tractor used for three jobs in the same week. On Monday it handles gravel with a front loader. On Wednesday it carries a sprayer for fence lines and orchard edges. On Friday it runs a hydraulic mower along a field margin. The engine horsepower has not changed, but each attachment asks the hydraulic system to behave differently. The loader needs predictable cylinder movement. The sprayer may need steady pump performance. The mower may need continuous flow without heat building too quickly.
That example shows why hydraulic planning should be job-based. If the tractor is sized only for the easiest attachment, the hardest attachment becomes a daily irritation. If the tractor is sized only for the hardest attachment, the owner may pay for capacity that is rarely used. The useful middle ground is to identify the attachments that truly need continuous hydraulic power, then make sure the tractor package can handle those tools without sacrificing steering, lifting, cooling, or safe control.
How to Talk With a Supplier About Hydraulic Requirements
A good supplier conversation uses numbers and tasks together. Ask for rated flow, pressure, remote valve options, loader cycle expectations, recommended couplers, and continuous-duty limits. Then describe the attachment, crop or material, slope, daily work time, climate, and operator experience. The more specific the job description, the easier it is to avoid a tractor that looks correct but works poorly.
Bring the attachment manual or specification sheet when possible. If the tool is not purchased yet, collect the flow range and pressure requirement from the manufacturer before committing to the tractor. A future attachment should not be treated as a vague possibility if it is central to the farm plan. It belongs in the buying decision now.
Heat, Oil Condition, and Filter Clues
Hydraulic heat is one of the clearest signs that the system is being stressed. Warm oil is normal after work, but oil that smells burnt, causes sluggish movement, or makes the system noisy deserves attention. Dirty filters, low oil, wrong fluid, blocked cooling airflow, or a mismatched attachment can all contribute. The operator should record when the symptom appears, which attachment was connected, and how long the tractor had been working.
Oil condition also tells a story. Foaming, milky appearance, dark color, or visible particles are reasons to stop and investigate. Do not keep cycling a loader or motor attachment when the oil looks wrong. Continued operation can spread contamination through valves, cylinders, pumps, and hoses.
Training Operators to Feel the System
Hydraulic training should include feel, sound, and timing. Operators should know how a normal loader cycle feels at idle and working rpm, how a healthy remote valve engages, and what the attachment sounds like when it is not under load. That baseline makes abnormal behavior easier to catch. A written checklist helps, but the operator?s hands and ears often notice the first change.
Teach operators to slow down when a control becomes jerky or delayed. Jerky movement can come from air, contamination, cold oil, valve issues, or a load that is beyond the comfortable range. A delayed response near a trailer, ditch, fence, or bystander can become a safety issue even if the tractor still has enough power to continue.
Record the Match, Not Just the Repair
When an attachment works well, record the tractor rpm, hydraulic setting, couplers used, hose route, ballast setup, and operator notes. That information helps the next operator repeat the setup. When an attachment works poorly, record the same details plus the symptom. A farm that records only failures loses the successful settings that made other jobs smooth.
The best result is a small attachment card or digital note for each tool. It can list required couplers, safe hose path, flow setting, grease points, transport position, and shutdown checks. This keeps hydraulic knowledge from living only in one experienced operator?s memory.
Management Notes for Daily Use
A practical article becomes more useful when it turns into a repeatable farm habit. Managers should decide who checks the machine, where notes are stored, when a concern is escalated, and which jobs require a second person. Without those simple rules, even a good checklist can become a private habit that disappears when the usual operator is away.
Keep the record short enough to use in the field. A useful note can include the date, tractor hours, attachment, ground condition, load, operator, and one sentence about anything unusual. Over time, these small notes show patterns: a recurring hose rub, a tire that loses pressure, an implement that is difficult to connect, or a field entrance that fails after every storm.
Review those notes before buying another attachment or changing the tractor setup. The best equipment decision is often hidden in ordinary records. If operators repeatedly mention slow cycles, rutting, heat, difficult hookup, or unstable handling, the farm has evidence for a better attachment match, different tire setup, route improvement, or additional operator training.
Practical FAQ
How should an operator use this guide? Treat it as a field planning aid, not a substitute for the tractor or implement manual. The manual controls service intervals, safe limits, fluids, torque values, and attachment requirements for the exact machine.
What should stop the job? Stop when the tractor behaves differently than expected, when a guard or hose is damaged, when the ground condition changes, when a warning light appears, or when the operator cannot explain a noise, leak, vibration, or handling change.
Where should the guide be stored? Keep a printed copy or short version near the service bay, key storage, or implement shed. A checklist hidden in an office folder will not help the operator who is already at the gate.