Email: [email protected] Whatsapp: +8618266768780

Email: [email protected] Whatsapp: +8618266768780

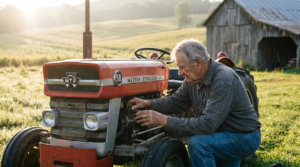
Trenching for Overview plays a critical role in construction projects. You must prioritize safety at every step. Trench collapse remains the most serious hazard you face on site. Strict safety protocols protect you and your team from life-threatening accidents. Always treat each trench as a potential risk area and approach every task with caution and preparedness.
Before you begin any excavation, you must conduct a thorough site assessment. This step forms the foundation for safe trenching for overview projects. You need to evaluate all site-specific risks and plan safety measures that address the unique conditions of your location.
Understanding soil type is critical for trench stability. You should always have a competent person analyze and classify the soil before excavation. The soil type determines which protective systems you need to prevent cave-ins. The following table outlines common soil types and their stability levels:
| Soil Type | Stability Level |
|---|---|
| Stable rock | Highest |
| Class A | Moderate |
| Class B | Lower |
| Class C | Lowest |
Loose or unstable soils, such as Class C, require extra caution. Inadequate soil assessment or lack of protective systems like shoring or shielding can lead to dangerous collapses.
Environmental conditions can change the risk profile of your trench. You must consider factors such as evaporation, water, vibration, and excessive load. The table below summarizes how these elements impact trench safety:
| Environmental Factor | Description |
|---|---|
| Evaporation | Air exposure decreases soil cohesion, making collapse more likely. |
| Water | Rain or melting snow weakens soil and erodes trench walls. |
| Vibration | Nearby machinery or traffic can destabilize trench walls. |
| Excessive load | Heavy equipment or spoil piles near the edge increase wall pressure. |
You should monitor these factors daily, as conditions can change rapidly.
You must identify hazards before starting any trenching for overview work. Common risks include trench collapse, hazardous atmospheres, and contact with underground utilities. A thorough site assessment helps you recognize these dangers early. Classifying soil types and using the right protective systems, such as sloping or shielding, reduces the risk of accidents. Regular atmospheric testing for hazardous gases and comprehensive worker training further enhance safety.
Tip: Always conduct a site walk-through with your team to spot potential hazards and discuss mitigation strategies.
Assign clear roles and responsibilities to your crew. Designate a competent person to oversee soil analysis, safety checks, and emergency planning. Make sure every worker understands their duties and knows how to report hazards. Effective communication and accountability are essential for a safe trenching operation.
Case Study:
On a recent project, a team encountered unexpected groundwater after a heavy rainstorm. The competent person halted work, reassessed the soil, and implemented additional shoring. This quick action prevented a potential collapse and kept everyone safe.
By prioritizing site assessment and safety planning, you set the stage for successful and secure trenching for overview operations.
Before you start any Trenching for Overview project, you must locate and mark all underground utilities. This step prevents costly damage, service interruptions, and serious injuries. You need to follow a systematic approach to utility identification and protection.
You should always review current and accurate utility maps before excavation. These maps help you understand the location of underground lines and reduce the risk of accidental strikes. Advanced mapping solutions, such as digital mapping and GIS systems, improve detection accuracy and support safe planning.
Contact your state’s 811 center or local utility providers before you dig. This step ensures that utility companies can mark their lines on your site. Wait for confirmation that all utilities have been marked before you begin any excavation. Open communication with utility owners helps you respond quickly to locate requests and keeps everyone informed.
Tip: Never rely solely on old records or assumptions. Utility lines may shift or change over time.
To accurately identify underground utilities, you can use several methods. The table below summarizes the most common techniques:
| Method | Description |
|---|---|
| Electromagnetic Locators | Utilize electromagnetic signals to trace utility lines, often requiring direct connection for accuracy. |
| Ground Penetrating Radar | Sends radio signals into the ground to create images of underground objects without digging. |
| Acoustic Methods | Detect sound frequencies from active utility systems, useful for identifying leaks or pressurized lines. |
| Vacuum Excavation | Safely exposes utilities with minimal risk of damage, using high-pressure air or water. |
| Hydro Excavation | Uses pressurized water to break up soil, ideal for difficult conditions. |
You must follow best practices when digging near marked utilities:
Note: Always wait for utility owners to confirm that all lines are marked before you start digging.
Prepare for emergencies by establishing clear procedures:
Case Study:
On a municipal project, a crew used ground penetrating radar and vacuum excavation to locate a water main before trenching. The team contacted the local utility locator service and waited for all lines to be marked. During excavation, workers found an unmarked fiber optic cable. Because the crew followed emergency procedures and stopped work, they avoided service disruption and costly repairs. For more information on safe digging practices, visit the Common Ground Alliance website.
By following these steps, you reduce the risk of utility strikes and ensure a safer Trenching for Overview operation.

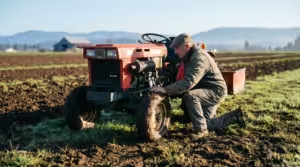
When you approach safe trenching, you must use proven methods and the right equipment to protect your team. Each step, from excavation to machinery operation, demands careful planning and strict adherence to safety protocols.
Shoring provides physical support to trench walls, preventing soil movement and collapse. You install hydraulic shoring from outside the trench, which keeps workers out of harm’s way during setup. This method works well in unstable soils or when you cannot slope the trench due to space limitations. Shoring systems, such as hydraulic shores or timber supports, create a secure environment for your crew.
Tip: Always have a competent person inspect shoring systems before each shift and after any event that could affect trench stability, such as heavy rain or vibrations.
Sloping and benching reduce the risk of trench collapse by cutting back the trench wall at an angle or creating horizontal steps. These methods work best in stable soils and open areas where you have enough space. Sloping involves angling the trench wall away from the excavation, while benching forms a series of steps. Both techniques lower the pressure on trench walls and help prevent cave-ins.
The following table compares common protective systems you can use for Trenching for Overview projects:
| Protective System | Description |
|---|---|
| Trench Boxes (Shielding) | Protect workers by resisting soil pressure, creating a safe zone even if walls fail. |
| Hydraulic Shoring | Supports trench walls to prevent movement, installed from outside the trench for added safety. |
| Sloping and Benching | Cuts walls back at an angle or creates steps to reduce collapse risk. |
| Hybrid Solutions | Combines methods for irregular trench shapes, ensuring no area is left unprotected. |
| Planning for Mobility | Uses collapsible or lightweight systems for quick adjustments while maintaining safety standards. |
You should select the method that best fits your site conditions, soil type, and available space.
Note: Studies show that trench shoring offers greater protection than sloping or benching. Trench shields can increase productivity by 133% compared to sloping or benching, and they significantly reduce project costs, especially in urban areas where minimizing excavation is crucial.
Choosing the right equipment is essential for safe and efficient trenching. You must match your machinery to the soil type, trench depth, and protective system you plan to use. The table below outlines the main types of protective systems and their functions:
| Type of Protective System | Description |
|---|---|
| Shoring | Installs supports to prevent cave-ins and soil shifting. |
| Sloping | Cuts back the trench wall at an angle away from the excavation. |
| Shielding | Uses trench boxes or other supports to avoid cave-ins. |
| Benching | Creates horizontal steps or levels to protect against cave-ins. |
You should also consider the mobility of your protective systems. Lightweight or collapsible solutions allow you to adjust quickly as the trench progresses, maintaining safety without sacrificing efficiency.
Operator safety must remain your top priority during trenching operations. You need to follow strict protocols to prevent accidents and injuries. The table below summarizes essential safety protocols for machinery operation:
| Safety Protocols | Description |
|---|---|
| Emergency Shutdown Procedure | Steps to safely shut down the machine in an emergency. |
| Common Hazards and Prevention | Guidelines to prevent utility strikes, entanglement, and trench collapses. |
| Trencher Safety Reminders | Best practices during and after operation to ensure safety. |
You should always:
Alert: Before you begin, mark the jobsite and call 811 to locate utility lines. Scan the area for hazards and remove any that you can safely handle. Establish a clear danger zone to keep bystanders safe.
On a recent city infrastructure project, a crew faced the challenge of installing new water lines in a congested downtown area. The team selected hydraulic shoring and trench shields to protect workers in narrow trenches. By using trench shields, the crew increased productivity by over 130% compared to traditional sloping. The project cost dropped from over $70,000 to less than $16,000, with shield rental fees remaining minimal. The team also used lightweight, collapsible systems to adjust quickly as the trench advanced. No injuries occurred, and the project finished ahead of schedule. For more insights on safe excavation, you can review guidance from the Occupational Safety and Health Administration (OSHA).
By following these safe trenching procedures, you create a secure work environment and ensure the success of your Trenching for Overview project.
Continuous monitoring and clear communication keep trenching operations safe and efficient. You must establish routines that ensure every worker understands their responsibilities and can report hazards quickly.
You need to inspect trenches and protective systems daily. Inspections must occur before each shift and after any event that could increase hazards, such as rainstorms or heavy equipment movement. OSHA mandates daily inspections to identify shifting soil, accumulated water, and other risks. Assign a competent person to conduct these checks and document findings for compliance.
| Inspection Task | Frequency | Responsible Party |
|---|---|---|
| Trench wall stability | Daily, before each shift | Competent person |
| Protective system verification | Daily, after hazardous events | Competent person |
| Access point checks | Daily | Competent person |
| Documentation | After each inspection | Safety supervisor |
Tip: Use a trench safety checklist to verify protective systems, clear access points, and the stability of trench boxes or shoring. Document every inspection to maintain a strong safety record.
You must encourage workers to report hazards immediately. Toolbox talks provide short, focused meetings that educate your team on recognizing and addressing trenching risks. These talks cover OSHA requirements, soil classification, protective systems, and common mistakes. Workers should have clear access to and from the trench, with proper exit methods available at all times.
Regular safety briefings and ongoing education reduce accidents. Train your crew in safety procedures, emergency response, and the correct use of equipment. Update workers on new regulations and best practices. Daily pre-shift utility status reviews with supervisors help everyone stay informed about site conditions.
You must prepare for emergencies with clear procedures. Immediate notification protocols, rescue strategies for different incidents, and a list of emergency contacts are essential. Equip your team with rescue equipment and ensure everyone knows medical treatment protocols, including first aid and CPR. Verify access routes, staging areas, and soil stability before starting work. Assign dedicated liaison officers to expedite inquiries and secure timely approvals.
Alert: Emergency response teams should mobilize quickly with equipment ready for unpredictable conditions. Essential gear includes jetting packs, excavators, pumps, and full PPE kits.
Case Study:
On a recent infrastructure project, daily inspections revealed water accumulation after a rainstorm. The competent person halted work, documented the hazard, and initiated emergency protocols. The team communicated the issue during a toolbox talk, reviewed rescue procedures, and resumed work only after verifying trench stability. This proactive approach prevented a potential collapse and ensured worker safety. For more guidance, visit OSHA’s Trenching and Excavation Safety page.
Effective monitoring and communication create a culture of safety. You protect your team and maintain compliance by prioritizing inspections, hazard reporting, and clear protocols.
You must follow strict compliance and training standards to maintain safety in trenching operations. Regulatory requirements and thorough worker education form the backbone of a safe jobsite.
You need to understand and apply the Occupational Safety and Health Administration (OSHA) standards for trenching and excavation. These rules appear in 29 CFR Part 1926, Subpart P. OSHA emphasizes preplanning, hazard identification, and the role of a competent person on every site. The standards require you to classify soil, use protective systems, and document all safety measures.
Note: OSHA’s trenching and excavation standards protect you by setting clear expectations for safety planning and daily operations.
The table below summarizes key OSHA requirements for trenching safety:
| Requirement | Description |
|---|---|
| Protective System | You must use sloping, benching, shoring, or shielding for trenches at least 5 feet deep. |
| Inspection | A competent person must inspect trenches daily and after any hazard-increasing event. |
| Depth Regulations | Trenches deeper than 20 feet require a design by a registered professional engineer. |
You must secure the proper permits before starting any trenching work. Local authorities require a trench permit to ensure your project meets all safety and regulatory standards.
Tip: Always check with your city or county for specific permit requirements. Non-compliance can result in costly delays or fines.
You must provide comprehensive training for every worker involved in trenching. Training programs should cover:
Alert: Well-trained workers spot hazards early and prevent accidents.
You must enforce the use of personal protective equipment (PPE) at all times. Standard PPE includes hard hats, high-visibility vests, gloves, steel-toed boots, and eye protection. Train your team on proper PPE selection, inspection, and maintenance.
Case Study:
On a recent public works project, a crew faced a surprise inspection by local regulators. The team had completed all required training and maintained up-to-date permits. Inspectors found all workers using proper PPE and following safe entry and exit procedures. The project passed inspection without delay, demonstrating the value of compliance and ongoing education.
For more information on trenching safety standards, visit the OSHA Trenching and Excavation Safety page or follow updates from OSHA on X (Twitter).
Accident prevention in trenching demands your full attention. You must use proven strategies to reduce risks and respond quickly when emergencies occur. The most serious threat you face is a cave-in, but you can minimize this danger with the right techniques and planning.
Cave-ins happen suddenly and can trap workers in seconds. You must use multiple strategies to keep your trench stable and your team safe.
Sloping and benching change the shape of trench walls to reduce pressure and prevent collapse. You cut back the wall at an angle or create steps for added stability. These methods work best when you match the slope to the soil type.
Recommended Slope Angles by Soil Type:
Tip: Always inspect trench walls after heavy rain or vibration. Adjust slopes and benches as needed to maintain stability.
Water weakens trench walls and increases collapse risk. You must manage water effectively to keep your trench safe.
Alert: Standing water signals danger. Remove it immediately and check for erosion before allowing work to continue.
| Strategy | Description |
|---|---|
| Shoring | Use lighter shoring systems with snap-together connections to save setup time and ensure safety. |
| Trench Shields (Trench Boxes) | Provide a protective shell for workers, allowing safe work inside while preventing soil collapse. |
| Easy Access | Place ladders or ramps within 25 feet for quick exit in emergencies. |
| Keep Spoil Away | Maintain a 2-foot distance between spoil piles and trench edges to prevent cave-ins. |
| Water Management | Remove standing water and monitor trench walls frequently to reduce cave-in risks. |
| Equipment Selection | Use compact equipment for better maneuverability and safer trench creation. |
You must prepare for emergencies before they happen. Fast, organized response saves lives and reduces injuries.
Rescue plans must cover both non-entry and entry rescue methods.
Note: Practice rescue drills regularly. Make sure every worker knows the plan and can act quickly.
Immediate first aid can make the difference between life and death after a trenching accident.
Case Study: Rapid Response Prevents Tragedy
A crew working on a municipal sewer upgrade noticed water pooling in a trench after a storm. The competent person stopped work and used pumps to remove water. During inspection, the team found cracks in the trench wall. Workers exited using ladders placed within 25 feet. The supervisor activated the rescue plan and contacted emergency services. No injuries occurred, and the project resumed safely after repairs. This case highlights the value of daily inspections, water control, and clear emergency procedures. For more guidance, visit OSHA’s Trenching and Excavation Safety.

🛡️ Stay vigilant. Your preparation and quick action protect lives and keep your project on track.
You ensure safe trenching by following a step-by-step approach. Assess the site, identify hazards, and plan protective measures. Mark utilities and use proper excavation methods. Monitor conditions and communicate with your team. Train workers and comply with regulations.
Stay proactive. Your commitment to safety protects lives and keeps every project on track.
You must always use a protective system, such as shoring, shielding, or sloping. This step prevents cave-ins and protects your team from serious injury.
You need to inspect trenches at least once daily and after any event that could affect stability, such as heavy rain or vibrations. A competent person should perform these checks.
Stop work immediately. Notify the proper authorities and your supervisor. Do not attempt repairs yourself. Follow your emergency procedures to keep everyone safe.
You should wear a hard hat, high-visibility vest, gloves, steel-toed boots, and eye protection. Inspect your PPE before each use to ensure it works properly.
A competent person has training and experience to identify hazards, classify soil, and implement safety measures. This person must have authority to stop work and correct unsafe conditions.
You must review utility maps and contact local utility providers. Wait for all lines to be marked before you dig. Use detection tools, such as ground-penetrating radar, for added safety.


-1.png)